A few nights ago, I plugged in a brand new projector into my laptop. After playing a simulation against a wall for a few minutes, I adjusted the unit and inadvertently cast the projected image on the floor. Out of nowhere my cat ran in and began to pounce on the dancing sprites as they swept across the carpet. She was fully convinced our bedroom had been invaded by colorful, bouncing insects and was doing her best to catch one.

I’ve spent the better part of a decade trying to code natural looking movement in a web browser. What I was witnessing felt like a huge victory. My feline QA team was hard at work batting down digital fireflies while I thought about the threshold of belief. What were the compelling qualities of the system I created that convinced her these targets were real enough to attack?
I’m not the first person to consider how we perceive our natural world and how we distinguish imitators. In ‘Vehicles: Experiments in Synthetic Psychology,’ Italian neuroscientist Valentino Braitenberg examines the fine line between accepting a natural versus designed system. It turns out, humans are pretty easy. It doesn’t take much for us to recognize natural movement. We’re fine tuned to a combination of special qualities. Add a few simple rules together and we’re more than ready to suspend our disbelief.
I define a natural system as a sum of forces acting on autonomous agents. The system contains a collection of independent objects that follow rules designed simulate the natural world. The rules are the key. How do we build and execute instructions in a web browser with enough realism that it throws a house cat into a spasm?
Why web browsers make this difficult
Before we start, it’s worth understanding why browsers make this a difficult task. Moving forward, we’re going to lean heavily on JavaScript and DOM manipulation. JavaScript and the DOM are built on an event model. Users do things. Browsers respond. We want the reverse. Right out of the gate we’ll animate objects at a lifelike 60 frames per second with no end in sight.
Browsers also juggle multiple tasks with competing priority. As much as we’d like it, they do not allocate all of their resources to rendering graphics. There’s a network to manage. It is a web browser after all. While we’ll attempt to focus the browser’s attention on drawing our system, we’ll never divert it from other system-level distractions.
Luckily, browsers have made a few advancements to overcome these hurdles. As we construct our framework, we’ll make use of the requestAnimationFrame API to optimize our frame rate. We’ll take advantage of hardware acceleration for an added boost. We’ll use vector math and model our system after a sum of forces. Finally, we’ll incorporate physical input via accelerometers for added realism.
The Big Picture
Our framework’s architecture will take a cue from procedural drawing programs like Processing. When we draw procedurally, we repeat two steps in a loop. First, we run a step function that calculates changes in our objects’ properties. Second, we translate those changes into style properties and render a new frame. If we manage to do it fast enough, we create a beautiful natural looking simulation.
At a high level, we’ll separate the system into three main components, System, World and Item. We’ll also build out some utilities and a Vector class to make our life easier. Ready to get started?
Our Project
To begin, we need to organize our project as a simple web page. Create a folder called SimpleSim with an index.html file. Also create a blank file called main.css and a blank file called simplesim.js. After this first step, we’ll do almost all our work in the simplesim.js file.
We will also make use of Modernizr to detect if our browser supports css transforms. More on that later. For now, download the latest Modernizr and place it in your project folder. To save on file size, if you’d like to create a custom build of Modernizr, select ‘2D Transforms’ and ‘3D Transforms’ as configuration options.
Your project should have the following structure:
SimpleSim/
  index.html
  main.css
  modernizr.js
  simplesim.js
Let’s edit the index.html file. Since we’ll create all our elements dynamically, index.html simply gives us an HTML body and references to our css and js files. Copy and paste the following HTML into index.html:
<!DOCTYPE html>
<html>
<head>
  <meta http-equiv="content-type" content="text/html; charset=UTF-8" />
  <meta name="viewport" content="user-scalable=no, width=device-width, initial-scale=1.0, maximum-scale=1.0" />
  <meta name='apple-mobile-web-app-capable' content='yes' />
  <title>Simple Simulator</title>
  <link rel="stylesheet" href="css/main.css" type="text/css" charset="utf-8" />
  <script src="scripts/simplesim.js" type="text/javascript" charset="utf-8"></script>
  </head>
  <body>
    <script type="text/javascript" charset="utf-8">

    </script>
  </body>
</html>
Notice we’re including meta tags for mobile devices. Mobile devices with sensors like accelerometers allow us to map real-world physical input to our simulation. Cool! Let’s push forward.
Creating the system
Our next step involves creating a System class. At its core, our system will iterate over a list of items and update their properties according to rules meant to simulate a natural environment. We’ll translate those properties into css values and update the browser’s viewport.
Since we’ll only have one System, we can use an object literal to begin:
var System = {
  name: 'System'
};
We’ll use an array to hold our items as well as a lookup table for fast lookups.
System._records = {
  lookup: {},
  list: []
};
Since we’ll be creating new items, it will be helpful to create unique ids.
System._idCount = 0;
The System’s four most important tasks are initializing, adding items, updating them and drawing them. Let’s start with initializing.
Remember our simulation consists of a System, World and collection of Items. Before we start our System, we need to know how to define the boundaries of our World. In the System’s initialization function, we’ll use our document’s body to represent our World and define its boundaries.
We also need to create some initial Items by passing in a function to the initialization function. In the end, it should look like this:
System.init = function(opt_setup, opt_world) {

  var setup = opt_setup || function () {},
      world = opt_world || document.body;

  System._records.list.push(new exports.World(world));
  setup.call(this);
};
To call the ‘init’ function, drop this line in the script tag in your index.html file.
SimpleSim.System.init();
At this point we can wrap up our system into a module and define the SimpleSim namespace. Your simplesim.js and index.html files should look like this:
Now there’s one problem. If you load index.html in a browser, you’ll see a JS error because we have not created a World class. So let do it.
A new World
A world defines the boundaries for our objects and carries a reference to a DOM element. We’ll append any items we add to the system to this world. We’ll also add an event listener to listen for resize events. But that’s down the road a bit. For now, let’s create a simple World class.
function World(el) {

    var viewportSize = exports.Utils.getViewportSize();

    if (!el || typeof el !== 'object') {
      throw new Error('World: A valid DOM object is required for a new World.');
    }

    this.el = el;
    this.el.className = 'world';
    this.width = viewportSize.width;
    this.height = viewportSize.height;
    this.location = {x: viewportSize.width / 2, y: viewportSize.height / 2};
    this.color = 'transparent';
    this.visibility ='visible';
}
World.prototype.world = {};
Notice we’re requiring a DOM element. For our purposes, it doesn’t make sense to create a World without a DOM element to represent it. We’re also using a utility function to determine our boundaries. Once we have width and height, we center the World in our viewport. We also define some rendering properties that will come in handy later.
Also, notice we’re assigning a blank object to a ‘world’ property. Worlds do not have child worlds. However, assigning a blank object avoids coding in extra logic in System._update().
We can now wrap up our World and Utility functions in a module. At this point, your simplesim.js file should look like this:
Adding items
A system without items is pretty boring. So let’s add some. Back in our system module, let’s add an ‘add’ function.
System.add = function(klass, opt_options) {

  var last, records = this._records.list,
      recordsLookup = this._records.lookup,
      options = opt_options || {};

  options.world = records[0];

  if (exports[klass]) {
    records[records.length] = new exports[klass](options);
  } else if (exports.Classes[klass]) {
    records[records.length] = new exports.Classes[klass](options);
  } else {
    throw new Error(klass + ' class does not exist.');
  }

  last = records.length - 1;
  recordsLookup[records[last].id] = records[last].el.parentNode;
  records[last].init(options);
  return records[last];
};
Remember, our system manages a collection of items. In our add function, we’re simply pushing a new instance of a class onto our records array. We check if the class exists in the SimpleSim namespace or in a Classes property. Finally, we initialize and return the item.
Organizing our item classes in a Classes property allows us to override it with an entirely new library of classes if needed. For example, later on, we’ll use our simulator to simulate a collection of rocks. We’ll build our Rock classes in a library namespaced like Rock.Pebble, Rock.Boulder, etc. Before we call System.init(), we’ll override Classes like SimpleSim.Classes = Rock. But we’ll save that exercise for later.
Meanwhile, in our index.html file, we’ll call ‘add’ from a function we pass into System.init. Change the line in the script tags to:
var system = SimpleSim.System;
system.init(function() {
  system.add('Item');
});
At this point, your SimpleSim files should look like:
If you load index.html in your browser, you should see an error in the console, “Uncaught Error: Item class does not exist”. We need to create an Item class.
Items in our World
Finally we can start populating our world. An item is simply an object with a unique id and a reference to a DOM element that represents it. Each time we add an item, we request a unique id from the system, create a div element and append that div element to the item’s world.
Our Item class should look like:
function Item(options) {

  if (!options || !options.world || typeof options.world !== 'object') {
    throw new Error('Item: A valid DOM object is required for the new Item "world" property.');
  }

  this.world = options.world;
  this.name = options.name || 'Item';
  this.id = this.name + exports.System.getNewId();

  this.el = document.createElement('div');
  this.el.id = this.id;
  this.el.className = 'item ' + this.name.toLowerCase();
  this.el.style.visibility = 'hidden';
  this.world.el.appendChild(this.el);
}

Item.prototype.init = function() {};

Item.prototype.step = function() {};
Notice we’re initially hiding the Item. At this point, the instance has no style properties and should be considered invisible. We also require a valid world as a passed option. Because we’re appending a new div, we need a valid container.
Also notice we stubbed init() and step() functions. At this point, your SimpleSim files should look like:
Make something move!
Ok, we’re almost there. Remember our System’s four most important responsibilities? Initialize. Add. Update. Draw. Let’s build out the update and draw functions.
Update is pretty simple. We just need loop through our array of Items and call step(). The step function contains rules modeled after the natural world. And what’s really cool… those rules are up to us to define.
For now, let’s keep it simple and change Item’s step function to:
Item.prototype.step = function() {
  this.location.y += 1;
};
We’ll also add a stubbed step function to our World. Just like in nature, our World can undergo changes that affect the items it contains. We can update it later.
World.prototype.step = function() {};
Next, let’s add an update function to System.
System._update = function() {

  var i, records = System._records.list, record;

  for (i = records.length - 1; i >= 0; i -= 1) {
    record[i].step();
  }

  for (i = records.length - 1; i >= 0; i -= 1) {
    record[i].draw();
  }
  window.requestAnimFrame(System._update);
};
You can see we’re looping through our array of objects twice. We first calculate changes to our items’ properties via step(). Next, we render the Items.
But why two loops?
In the natural world, things die. In our world, items die as well. And if they do, we do not want to draw them. Items may also be affected by other items. To avoid any rendering inconsistencies, it’s best to sort out all the data before rendering it.
Ok, but why are we looping backwards?
Another good question. Remember I mentioned things die in a natural world. If one of our items in our array dies and is removed from the array, we’ll encounter an error in our for loop because the array shortens during the loop. However, if we start from the end of the array, it doesn’t matter if the array decreases in size.
What is this window.requestAnimFrame?
It’s our secret weapon. requestAnimationFrame is an API for managing animation timers in a web browser. Remember, for our system to appear realistic, it needs to maintain a consistent 60 frames per second rate. When you pass a function to requestAnimationFrame and setup a recursive loop, the browser tries as best it can to execute it 16 milliseconds. If we step through and draw everything in less than 16 milliseconds, the browser knows to wait out the difference to match the 60fps we’re looking for.
If our step and draw function take longer than 16 ms, that’s our problem. For now, let’s get drawing.
Drawing
Ok, I swear we’re almost there. The last step in simulating a system is actually rendering items to the screen. For that, we’ll use css and a DOM element’s best friend, the cssText property.
Our overall strategy relies on mapping item properties to css values and updating the corresponding DOM element’s cssText property. To do this, we’ll need two functions, one to do the mapping and one to build the cssText value.
A draw function in our System will contain our object property to css property mapper.
System._draw = function(obj) {

  obj.el.style.cssText = exports.System.getCSSText({
    x: obj.location.x - (obj.width / 2),
    y: obj.location.y - (obj.height / 2),
    width: obj.width,
    height: obj.height,
    color0: obj.color[0],
    color1: obj.color[1],
    color2: obj.color[2],
    visibility: obj.visibility
  });
};
We pass in an object and send its relevant properties to a function that concatenates a string for the cssText property.
System.getCSSText = function(props) {
  return 'position: absolute; left: ' + props.x + 'px; top: ' + props.y + 'px; width: ' +
      props.width + 'px; height: ' + props.height + 'px; background-color: ' +
      'rgb(' + props.color0 + ', ' + props.color1 + ', ' + props.color2 + ');' +
      'visibility: ' + props.visibility + ';';
};
We also need to call System._draw from Item and from World.
Item.prototype.draw = function() {
  exports.System._draw(this);
};

World.prototype.draw = function() {
  exports.System._draw(this);
};
If we run this code now, we still won’t see anything because Item is currently not setting the properties needed by System._draw(). Let’s add them to Item.init().
Item.prototype.init = function(opt_options) {

  var options = opt_options || {};

  this.location = options.location || {x: this.world.width / 2, y: this.world.height / 2};
  this.width = options.width || 20;
  this.height = options.height || 20;
  this.color = options.color || [0, 0, 0];
  this.visibility = options.visibility || 'visible';
};
At this point, your SimpleSim files should look like this:
Ok. Are you ready? Drumroll… run index.html in a browser or view the code in action.
Is a black square moving down the screen? Ok, it’s not the most impressive animation. And it hardly looks natural. But we’re on our way. If you’ve made it this far, the hard work is really over. Now we’ll concentrate on the rules that make our system appear natural.

Cleanup
First, let’s do a little css clean up. The natural world does not have arbitrary margins and neither should ours. Remember we created a main.css file. Open it up and add the following:
.world {
  position: relative;
  margin: 0;
  padding: 0;
  overflow: hidden;
}

.item {
  position: absolute;
  top: 0; left: 0;
  -webkit-box-sizing: border-box;
  -moz-box-sizing: border-box;
  -o-box-sizing: border-box;
  -ms-box-sizing: border-box;
  box-sizing: border-box;
}
We cleared up the margins and set relative positioning. Now, any absolutely positioned items will be positioned relative to the world location. We also included the item’s border when calculating its size. Finally, we set absolute positioning on our item and set its initial location to the world’s origin. Up to now, we’ve been using absolute positioning to position our items. That will change with the next section.
Transforms
CSS Transforms apply linear transformations to HTML elements. We can position, rotate, skew DOM elements in both 2D and 3D space. It turns out when browsers apply 3D transformations, they invoke the computer’s GPU and accelerate rendering. To take advantage of this boost, we’re going to replace the absolute positioning we’re using in System.draw() with CSS transforms.
The downside to using transforms is not all browsers support them. And some browsers only support 2D transforms. Remember, we downloaded Modernizr into our project. We’ll use it to determine what transform features our browser supports and concatenate an appropriate string to position our items.
First, let’s pass a map of Modernizr properties when calling System.init() from index.html.
var system = SimpleSim.System;
system.init(function() {
  system.add('Item');
}, null, {
  csstransforms3d: Modernizr.csstransforms3d,
  csstransforms: Modernizr.csstransforms
});
Next, let’s include a third argument in System.init() to accept the supported properties and concatenate the appropriate positioning string.
System.init = function(opt_setup, opt_world, opt_supportedFeatures) {

  var setup = opt_setup || function () {},
        world = opt_world || document.body,
        supportedFeatures = opt_supportedFeatures || null;

  if (supportedFeatures.csstransforms3d) {
    this._stylePosition = '-webkit-transform: translate3d(<x>px, <y>px, 0); -moz-transform: translate3d(<x>px, <y>px, 0); -o-transform: translate3d(<x>px, <y>px, 0); -ms-transform: translate3d(<x>px, <y>px, 0);';
  } else if (supportedFeatures.csstransforms) {
    this._stylePosition = '-webkit-transform: translate(<x>px, <y>px); -moz-transform: translate(<x>px, <y>px); -o-transform: translate(<x>px, <y>px); -ms-transform: translate(<x>px, <y>px);';
  } else {
    this._stylePosition = 'position: absolute; left: <x>px; top: <y>px;';
  }

  System._records.list.push(new exports.World(world));
  setup.call(this);
  this._update();
};
Finally, let’s use this._stylePosition in System.getCSSText().
System.getCSSText = function(props) {
  return this._stylePosition.replace(/<x>/g, props.x).replace(/<y>/g, props.y) + ' width: ' +
      props.width + 'px; height: ' + props.height + 'px; background-color: ' +
      'rgb(' + props.color0 + ', ' + props.color1 + ', ' + props.color2 + ');' +
      'visibility: ' + props.visibility + ';';
};
Reloading index.html in a browser, you may notice the box’s motion is a little smoother. Notice that even though we’re creating a 2D animation, we’re using translate3D when possible in our position. Even if we pass a value of 0, the browser will invoke the GPU. For other browsers with less support, we’re falling back on 2D transforms and finally absolute positioning.
At this point our SimpleSim files should look like:
Vectors
Now that we’re moving things around, it’s time to pile on the forces. Remember, we defined a natural system as the sum of forces acting on autonomous agents. In our system so far, we’ve used a constant velocity to scoot our box in one direction. We’ll need much more variety for this system to look realistic. Enter Vectors.
Think of a vector as an offset. It represents the difference in location between two points. For example, the vector below represented by the arrow defines the difference between point A and point B.
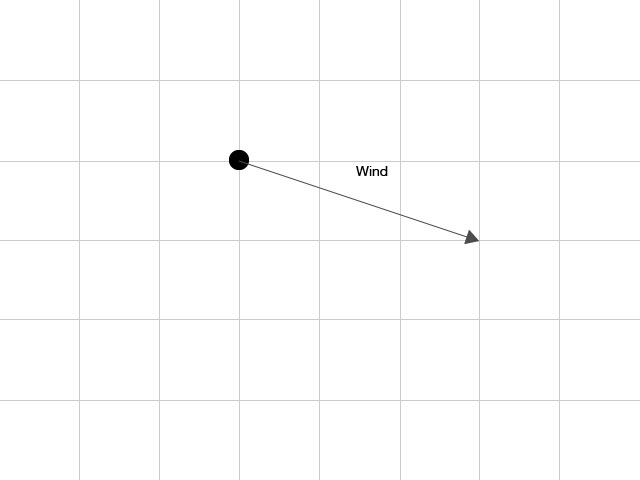
In our coordinate space, we’ve moved right by 3 steps and down by 1 step. In JavaScript, we can represent this as:
var vectorWind = {
  x: 3,
  y: -1
};
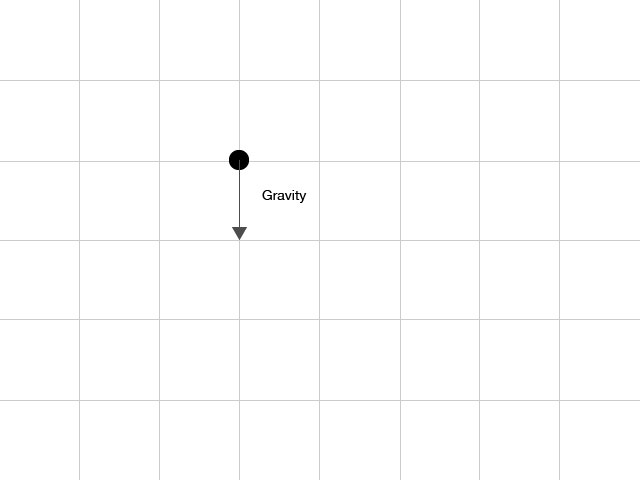
Let’s say we have another vector representing gravity that points directly down.
var vectorGravity = {
  x: 0,
  y: -1
};
In our system, if we want to apply the sum of both the wind and gravity forces to our box’s location, we need to first add these forces. This is where Vectors make our life easier. When adding these, we’re essentially doing this:
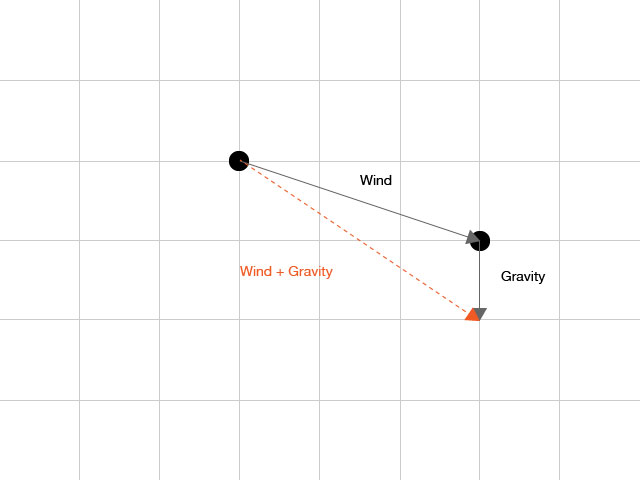
We can represent this programmatically as:
var vectorSum = {
  x: vectorWind.x + vectorGravity.x,
  y: vectorWind.y + vectorGravity.y
};
or
var vectorSum = {
  x: 3,
  y: -2
};
When we apply this force to our block’s location, it will move right 3 steps and down 2 steps. You can probably anticipate we’ll be doing a lot of Vector math in our system. Instead of going over ever possible operation, let’s roll up our mathematical operations in a class called Vector. Download the Vector library at the gist below and append it to the list of modules in simplesim.js.
Now that we’re using vectors, we should update our Item and World. First, in our Item’s init() function, we can define location as:
Item.prototype.init = function(opt_options) {
  ...
  this.location = options.location || new exports.Vector(this.world.width / 2, this.world.height / 2);
  ...
};
Second, in our World constructor, we can define location as:
function World(el) {
  ...
  this.location = new exports.Vector(viewportSize.width / 2, viewportSize.height / 2);
  ...
}
Now, let’s represent gravity as a vector. Gravity is a World property. Let’s add it to our World constructor.
function World(el) {
  ...
  this.location = new exports.Vector(viewportSize.width / 2, viewportSize.height / 2);
  this.gravity = new exports.Vector(0, 0.1);
  ...
}
Back in our Item’s step function, we can replace our only line with some Vector math.
Item.prototype.step = function() {
  this.location.add(this.world.gravity);
};
Reloading index.html in a browser, we shouldn’t see any difference. However, now that we’ve switched to Vectors, we’re ready to refine our object’s motion and add more realism.
Acceleration and Velocity
If you remember your high school physics, you’ll remember we can define an object’s location in space in terms of its velocity. The formula to calculate velocity…
velocity = distance / time
… defines it as a change in position in a given amount of time.
When velocity changes, we call it acceleration. We can define an objects’s acceleration as the rate of change in velocity.
It looks like we have a pattern of offsets here. Offsets? Sound familiar? Remember, vectors are offsets. We can now express the relationship between acceleration and velocity and location using vectors.
velocity.add(acceleration);
location.add(velocity);
We have a constant acceleration expressed as gravity. Let’s add a velocity property to Item and update our Item.step() function.
Item.prototype.init = function(opt_options) {
  ...
  this.velocity = options.velocity || new exports.Vector();
  this.location = options.location || new exports.Vector(this.world.width / 2, this.world.height / 2);
  ...
};

Item.prototype.step = function() {
  this.velocity.add(this.world.gravity);
  this.location.add(this.velocity);
};
Reload index.html in your browser. Looks better! As the block falls, its velocity changes. In other words, it accelerates. Congratulations. We’ve added more detail and taken a big step toward a more realistic system.
At this point, your SimpleSim files should look like:
Applying forces
As mentioned before, we want to sum our forces by adding them all together and applying the total to the items in our world. Let’s look at Newton’s second law of motion for direction.
Law II: The alteration of motion is ever proportional to the motive force impress’d; and is made in the direction of the right line in which that force is impress’d.
Given our understanding of velocity, we can read “alteration of motion” as “acceleration”. And “the direction of the right line” sounds a lot like a vector. If acceleration is proportional to force, and force is a vector, we can write it like this:
A = F
Wow. Easy. Let’s write a function that adds a given force to our Item’s acceleration.
Item.prototype.applyForce = function(force) {
  var vector = new exports.Vector(force.x, force.y);
  this.acceleration.add(vector);
};
We can now call applyForce() for every force in our system to determine acceleration. Let’s add an acceleration property to Item and update Item.step().
Item.prototype.init = function(opt_options) {
  ...
  this.acceleration = options.acceleration || new exports.Vector();
  this.velocity = options.velocity || new exports.Vector();
  this.location = options.location || new exports.Vector(this.world.width / 2, this.world.height / 2);
  ...
};

Item.prototype.step = function() {
  this.applyForce(this.world.gravity);
  this.velocity.add(this.acceleration);
  this.location.add(this.velocity);
};
Reload index.html in your browser. Whoosh! Something is not right. When we calculate the total force in our system, we need to do it for a snapshot in time. This means our acceleration property should be reset after each frame. Multiplying it by 0 will do it.
Item.prototype.step = function() {
  ...
  this.acceleration.mult(0);
};
A “sum” total of forces implies using more than just one. So let’s add a few more. How about some wind blowing to the right and some thermal energy moving up from the ground. Add wind and thermal properties to our World and apply them in Item.step().
function World(el) {
  ...
  this.location = new exports.Vector(viewportSize.width / 2, viewportSize.height / 2);
  this.gravity = new exports.Vector(0, 0.1);
  this.wind = new exports.Vector(0.05, 0);
  this.thermal = new exports.Vector(0, -0.025);
  ...
}

Item.prototype.step = function() {
  this.applyForce(this.world.wind);
  this.applyForce(this.world.thermal);
  this.applyForce(this.world.gravity);
  ...
};
Load index.html in a browser and you should see our block move to the right and down. Cool right? Take a few minutes and play with the initial values to create some variations.
Credit for the force formulas above goes to Daniel Shiffman who recently published a book called, Nature of Code. Check it out for a more extensive look at the physics behind natural looking motion. http://natureofcode.com
Mass
We’re on the right track but have left out an important concept: mass. Mass describes the quantity of matter in an object. Newton’s second law of motion is meant to be applied to constant-mass systems where mass is inversely proportional to acceleration. The same force should move a smaller object faster than a larger object. Let’s add a mass property to our Item and factor it into our applyForce() function.
Item.prototype.init = function(opt_options) {
  ...
  this.width = options.width || 20;
  this.height = options.height || 20;
  this.mass = (this.width * this.height) * 0.01;
  ...
};

Item.prototype.applyForce = function(force) {
  var vector = new exports.Vector(force.x, force.y);
  vector.div(this.mass);
  this.acceleration.add(vector);
};
Notice we’re calculating mass based on width and height and a constant. In nature, not all large objects necessarily have a large mass. But for the sake of simplicity, in our system we’ll make mass proportional to size and adjust it using a constant.
To see the effect, let’s create several objects with varying mass. Update your System.init() in index.html file like this.
system.init(function() {
  for (var i = 1; i < 11; i++) {
    var size = i * 10;
    system.add('Item', {
      width: size,
      height: size
    });
  }
}, null, {
  csstransforms3d: Modernizr.csstransforms3d,
  csstransforms: Modernizr.csstransforms
});
You should see the larger items trail behind the smaller items.
Are you tired of the items disappearing off screen? Let’s add a quick checkWorldEdges() function and call it before we calculate location.
Item.prototype._checkWorldEdges = function() {

  var world = this.world,
      location = this.location,
      velocity = this.velocity,
      width = this.width,
      height = this.height;

  if (location.x + width / 2 > world.width) {
    location.x = world.width - width / 2;
    velocity.x *= -1;
  } else if (location.x < width / 2) {
    location.x = width / 2;
    velocity.x *= -1;
  }

  if (location.y + height / 2 > world.height) {
    location.y = world.height - height / 2;
    velocity.y *= -1;
  } else if (location.y < height / 2) {
    location.y = height / 2;
    velocity.y *= -1;
  }
};

Item.prototype.init = function(opt_options) {
  ...
  this.checkWorldEdges = options.checkWorldEdges === undefined ? true : options.checkWorldEdges;
  ...
};

Item.prototype.step = function() {
  ...
  if (this.checkWorldEdges) {
    this._checkWorldEdges();
  }
  ...
};
Reload index.html in your browser.

Now we’ve got something! You should see several items bouncing of the viewport’s boundaries. Take a few minutes to play with the World values and see how they effect the system.
A quick optimization
Notice in our applyForce() function we create a new object to add to acceleration.
Item.prototype.applyForce = function(force) {
  var vector = new exports.Vector(force.x, force.y);
  ...
};
Why not just use the passed force? In JavaScript, when we pass an object to a function, we still maintain a reference to the original object. If we didn’t create a new object to divide by mass, we would divide the original forces, wind, gravity, etc. These values would quickly diminish to near zero and nothing would happen.
Instead, we create a new value based on the scalar values of the passed force. However, in JavaScript, we incur debt each time we create a new object. At some point in our simulation, the browser will reclaim the memory that all these Vector objects occupy. When that happens, we’ll see a stutter in our normally fluid motion.
To avoid disruptions, let’s recycle an object. Add a ‘cacheVector’ property to World that we’ll reference from Item.step().
function World(el) {
  ...
  this.cacheVector = new exports.Vector();
}

Item.prototype.applyForce = function(force) {
  var vector = this.world.cacheVector;
  vector.x = force.x;
  vector.y = force.y;
  vector.div(this.mass);
  this.acceleration.add(vector);
};
Instead of creating new Vector objects every frame, we’re altering an object we’ve created once with our World. Nice.
At this point, your SimpleSim files should look like:
Resizing the World
When browsing the web, it’s convenient we can resize our browser. We can make room for other programs, open multiple browsers, etc. However, when we’re using the viewport as our World boundary, resizing becomes a pain. Load up your index.html file and resize the window to see the problem. Our World dimensions and the viewport dimensions are not bound causing objects to disappear or bounce off invisible barriers.
To bind our World boundaries to the viewport, we’ll add an event listener to our System.init() function. To deal with browser inconsistencies, we’ll also add a utility function.
Utils._addEvent = function(target, eventType, handler) {
  if (target.addEventListener) { // W3C
    target.addEventListener(eventType, handler, false);
  } else if (target.attachEvent) { // IE
    target.attachEvent("on" + eventType, handler);
  }
};

System.init = function(opt_setup, opt_world, opt_supportedFeatures) {
  ...
  exports.Utils._addEvent(window, 'resize', function(e) {
    System._resize.call(System, e);
  });
};
Next, we’ll create a function to handle the event.
System._resize = function() {

  var i, max, records = this._records.list, record,
      viewportSize = exports.Utils.getViewportSize(),
      world = records[0];

  for (i = 1, max = records.length; i < max; i++) {
    record = records[i];
    record.location.x = viewportSize.width * (record.location.x / world.width);
    record.location.y = viewportSize.height * (record.location.y / world.height);
  }

  world.width = viewportSize.width;
  world.height = viewportSize.height;
  world.location = new exports.Vector((viewportSize.width / 2),
    (viewportSize.height / 2));
};
After the browser’s viewport resizes, we iterate through our objects and reposition them based on the new viewport size. Notice we avoid updating the World by starting our iteration at index 1. Finally, we reset the World bounds and position it at the center of the viewport.
Load up index.html in a browser and resize the window back and forth. The items should adjust to the new boundaries.
Mapping the physical world
Now that we’re up and running, it’s time to connect our simulated world with the real world. Most handheld devices carry several sensors that collect data like GPS, linear acceleration, angular acceleration, etc. Lucky for us, mobile web browsers are starting to provide access to that data.
Much like the resize event, we can listen for devicemotion motion events. The browser fires the event at regular intervals and provides data we can map to our world. Let’s give it a shot.
In our System.init() function, let’s add an event listener for the devicemotion event.
System.init = function() {
  ...
  exports.Utils._addEvent(window, 'devicemotion', function(e) {

    var world = System._records.list[0],
        x = e.accelerationIncludingGravity.x,
        y = e.accelerationIncludingGravity.y;

    if (window.orientation === 0) {
      world.gravity.x = x;
      world.gravity.y = y * -1;
    } else if (window.orientation === -90) {
      world.gravity.x = y;
      world.gravity.y = x;
    } else {
      world.gravity.x = y * -1;
      world.gravity.y = x * -1;
    }
  });

};
When the event is fired, we first lookup values for accelerationIncludingGravity. This property describes the device’s acceleration in 3D space. (Disclaimer: The spec for this property has not been completed. The following code has been tested on mobile Safari on iOS. You may have different results in other browsers and other devices.)
At this point, we’ve created a 2D world and are only interested in acceleration along the x and y axis. Most mobile devices that support portrait and landscape orientations will update the browser’s window.orientation property when the orientation changes. We’ll use the orientation property to help us map the device’s acceleration to our world’s gravity.
The accelerationIncludingGravity represents a change in the device’s velocity. Sound familiar? It’s a Vector. Binding those values to our world’s gravity means as we tilt and pitch our device, we should see our Items affected accordingly.
If you can load your SimpleSim to a web server and point your browser to the project, go ahead. If not, just use the URL below:
http://www.florajs.com/simplesim
Pretty cool!
But it’s a bit chaotic, right? Up to now, we’ve allowed our items to travel at boundless speeds. But that’s not how the real world works. There are forces like friction and factors like air density and aerodynamics that constrain objects to a maximum velocity. Let’s simulate these factors with a simple limit function in Item.step().
First, add a maxSpeed property in Item.init().
Item.prototype.init = function(opt_options) {
  ...
  this.maxSpeed = options.maxSpeed || 5;
};
Next, call the limit function provided with our Vector library.
Item.prototype.step = function() {
  ...
  this.velocity.add(this.acceleration);
  this.velocity.limit(this.maxSpeed);
  if (this.checkWorldEdges) {
    this._checkWorldEdges();
  }
  ...
};
In the real world, when objects collide, energy is transferred. Throw a ball at a wall and it will bounce back with less speed than when you first threw it. Let’s also remove some energy from our items with a bounciness property.
Item.prototype.init = function(opt_options) {
  ...
  this.bounciness = options.bounciness || 0.8;
};
In our System._checkWorldEdges(), when an Item crosses a boundary, we reverse the velocity. Let’s also multiply it by the item’s bounciness.
Item.prototype._checkWorldEdges = function() {
  ...
  if (location.x + width / 2 > world.width) {
    location.x = world.width - width / 2;
    velocity.x *= -1 * this.bounciness;
  }
  ...
};
Like the physical world, our items lose some energy when they collide and eventually come to rest.
Now reload your mobile browser. Wow! Pretty convincing isn’t it? We know we’ve just created 10 divs on an HTML page. But it really feels like we’re pitching blocks with real weight around the slick surface of our screen. Now would be time to lay your phone in front of a pet and see if you get a reaction.
Custom objects
Well done. You’ve made it this far and have a cat toy to prove it. But let’s take our simulation a few steps further.
The real world is not limited to one type of object. Why should we be? We can add limitless possibilities with our simulations by extending our core Item class to custom objects. Here’s how.
Let’s add a library of classes called Rocks to our project. Create a file called rocks.js and save it to the root of our project with the following.
Rocks = {}; exports = Rocks;

(function(exports) {

  function Pebble() {

  }

  exports.Pebble = Pebble;

}(exports));
Make sure to reference rock.js after simplesim.js in index.html.
...
<script src='modernizr.js' type='text/javascript' charset='utf-8'></script>
<script src='simplesim.js' type='text/javascript' charset='utf-8'></script>
<script src='rocks.js' type='text/javascript' charset='utf-8'></script>
...
Next, we need a utility function to extend SimpleSim.Item. Add the following function to SimpleSim.Utils.
Utils.extend = function(subClass, superClass) {
  function F() {}
  F.prototype = superClass.prototype;
  subClass.prototype = new F;
  subClass.prototype.constructor = subClass;
};
This function simply links a subClass and superClass via the JavaScript prototype chain. Back to our Rocks library, let’s add some properties and extend Pebble.
function Pebble(opt_options) {
  var options = opt_options || {},
      index = opt_options.index || 5,
      size = 10 + 1 * index;
  options.width = size;
  options.height = size;
  options.color = [SimpleSim.Utils.getRandomNumber(100, 255), SimpleSim.Utils.getRandomNumber(10, 100), 0];
  options.maxSpeed = 15;
  SimpleSim.Item.call(this, options);
}
SimpleSim.Utils.extend(Pebble, SimpleSim.Item);
Now, when we create a new Pebble and pass some options, we pass them along to Item. We’re making use of an optional index property to create proportionally sized instances.
Variation is an important quality for a natural system. Look around the natural world and you’ll notice quickly that nothing is exactly the same. Our pebbles should all look different. For now, we’ll use a getRandomNumber utility function to vary the color.
Let’s create some boulders.
function Boulder(opt_options) {
  var options = opt_options || {},
      index = opt_options.index || 5,
      size = 100 + 10 * index;
  options.width = size;
  options.height = size;
  options.color = [SimpleSim.Utils.getRandomNumber(100, 255), SimpleSim.Utils.getRandomNumber(100, 255), 0];
  options.maxSpeed = 15;
  SimpleSim.Item.call(this, options);
}
SimpleSim.Utils.extend(Boulder, SimpleSim.Item);
In index.html, we’ve updated System.init() to create more Pebbles than Boulders.
system.init(function() {
  for (var i = 1; i < 11; i++) {
    system.add('Pebble', {
      index: i
    });
    if (i < 7) {
      system.add('Boulder', {
        index: i
      });
    }
  }
}
...
You should see the boulders moving much slower than the pebbles. You should notice that each time you reload, the colors are different.
But have you ever seen a square boulder? Also, real world objects have angular acceleration as well. They rotate. The topic of angular acceleration is beyond the scope of this article. But we can make a good approximation by mapping location on the x-axis to an ‘angle’ property.
Let’s add a border-radius style property to smooth out our rocks and an angle property. Remember we’re registering our style properties in System.draw() and concatenating the style text in System.getCSSText().
System._draw = function(obj) {

  var cssText = exports.System.getCSSText({
    ...
    borderRadius: obj.borderRadius,
    a: obj.angle
  });
  obj.el.style.cssText = cssText;
};

System.getCSSText = function(props) {
  return this._stylePosition.replace(/<x>/g, props.x).replace(/<y>/g, props.y).replace(/<a>/g, props.a) + ' width: ' +
      props.width + 'px; height: ' + props.height + 'px; background-color: ' +
      'rgb(' + props.color0 + ', ' + props.color1 + ', ' + props.color2 + ');' +
      'visibility: ' + props.visibility + '; border-radius: ' + props.borderRadius + '%';
};
We’ll use transforms to rotate the item. We need to update the stylePosition string we’re assigning in System.init().
if (supportedFeatures.csstransforms3d) {
  this._stylePosition = '-webkit-transform: translate3d(<x>px, <y>px, 0) rotate(<a>deg); -moz-transform: translate3d(<x>px, <y>px, 0) rotate(<a>deg); -o-transform: translate3d(<x>px, <y>px, 0) rotate(<a>deg); -ms-transform: translate3d(<x>px, <y>px, 0) rotate(<a>deg);';
} else if (supportedFeatures.csstransforms) {
  this._stylePosition = '-webkit-transform: translate(<x>px, <y>px) rotate(<a>deg); -moz-transform: translate(<x>px, <y>px) rotate(<a>deg); -o-transform: translate(<x>px, <y>px) rotate(<a>deg); -ms-transform: translate(<x>px, <y>px) rotate(<a>deg);';
} else {
  this._stylePosition = 'position: absolute; left: <x>px; top: <y>px;';
}
We also need to add properties to Item.init() and update Item.step() to assign the angle.
Item.prototype.init = function(opt_options) {
  ...
  this.borderRadius = options.borderRadius || 0;
  this.angle = options.angle || 0;
};

Item.prototype.step = function() {
  ...
  this.angle = this.location.x;
  ...
};
Now, back in our Pebble and Rock classes we can specify a borderRadius as a percentage. Since pebbles are small, let’s make them very close to perfectly round. Let’s make the boulders a bit more squared off. Also, note we’re randomizing the sizes for more variety.
function Pebble(opt_options) {
    ...
    options.borderRadius = SimpleSim.Utils.getRandomNumber(40, 50);
    ...
}

function Boulder(opt_options) {
    ...
    options.borderRadius = SimpleSim.Utils.getRandomNumber(30, 40);
    ...
}
Load index.html and you should see some smoother rocks. Take a few minutes and play with the values and explore the possibilities or check out the video:
Your SimpleSim files should look like this:
Playback controls
Whew! We’ve come a long way. Let’s now add a few playback controls for pausing, resetting and stepping through our system via the keyboard. First, let’s add a keyup event listener to System.init() and a handler.
System.init = function(opt_setup, opt_world, opt_supportedFeatures) {
  ...
  this._addEvent(window, 'keyup', function(e) {
    System._keyup.call(System, e);
  });
};

System._keyup = function(e) {

  var world = this._records.list[0];

  switch(e.keyCode) {
    case 39:
      System._stepForward(); // right arrow: step forward
    break;
    case 80: // p; pause/play
      world.pauseStep = !world.pauseStep;
      break;
    case 82: // r; reset
      System._resetSystem();
      break;
  }
};
We’ve mapped the r key to a resetSystem() function we’ll add soon. We’ve also mapped the p key to an assignment. The world’s pauseStep property is set to the reverse of its current value. We’ll use it in System.update() to bypass the step() function. All objects will be drawn but their properties will not change.
function World(el) {
  ...
  this.pauseStep = false;
}

System._update = function() {
  ...
  for (i = records.length - 1; i >= 0; i -= 1) {
    record = records[i];
    if (record.world && !record.world.pauseStep) {
      record.step();
    }
  }
  ...
};
Load up index.html and give it a shot. You should be able to toggle the playback. Now let’s reset the system. We’ll add the resetSystem() function.
System._resetSystem = function(opt_noRestart) {

  var world = this._records.list[0],
      viewportSize = exports.Utils.getViewportSize();

  world.pauseStep = false;
  while(world.el.firstChild) {
    world.el.removeChild(world.el.firstChild);
  }
  world.location = new exports.Vector((viewportSize.width / 2),
    (viewportSize.height / 2));
  this._records.list = this._records.list.splice(0, 1);
  System._setup.call(System);
};
We’re un-pausing playback, removing all DOM elements, centering the world and splicing off all items from the records lists except the world. Finally, we’re running our setup function again.
Load up index.html and hit the r key a bunch of times. You should see the system reset.
We also mapped the right arrow key to a stepForward() function. Let’s add it.
System._stepForward = function() {

  var i, records = System._records.list,
      world = this._records.list[0];

  world.pauseStep = true;

  for (i = records.length - 1; i >= 0; i -= 1) {
    records[i].step();
  }
  for (i = records.length - 1; i >= 0; i -= 1) {
    records[i].draw();
  }
};
This looks a lot like our update function. However, there’s some important differences. First, we force the system to pause. Next, we step() and draw() against our items. What’s missing? Ah, the call to requestAnimationFrame. Since we don’t need another frame, we don’t need to request one. Pressing p will un-pause the system.
Load up index.html and repeatedly press the right arrow key. Our simulation is in super slow motion.
Camera Control
When we observe our simulation, we’re viewing from a 3rd person perspective. The world is flush with the edges of our browser’s viewport. We can view all our items at once.
We can also take a 1st perspective and view our system from perspective of one of the items. When we switch from 3rd to 1st person, it’s like we’re switching cameras from wide angle to a tracking cam. It sounds complicated but turns out to be easy thanks to Vectors.
Add a camera property to World, a controlCamera property to Item, and a checkCameraEdges() function to Item.
function World(el) {
  ...
  this.camera = new exports.Vector();
}

Item.prototype.init = function(opt_options) {
  ...
  this.controlCamera = options.controlCamera === undefined ? false : options.controlCamera;
};

Item.prototype._checkCameraEdges = function() {
  this.camera.x = this.velocity.x;
  this.camera.y = this.velocity.y;
  this.world.location.add(this.camera.mult(-1));
};
Next, we need to choose an item to track. Let’s use the last pebble. Update the System.init() call in index.html. Also, so we can better see our World boundaries, update the World’s color property and add a rule to main.css.
system.init(function() {
  ...
    system.add('Pebble', {
      index: i,
      controlCamera: i === 10
    });
  ...
});

function World(el) {
  ...
  this.color = [230, 230, 230];
  ...
}

html {
  background-color: #fff;
}
Load up index.html and notice how our perspective has changed! We’re following the last pebble as it travels around the World. If you get stuck in a corner, just hit the r key.

Your SimpleSim files should look like this:
Add some mouse input
Back on desktop, we’ve got a nice system going except for a few things. First, our system eventually comes to rest which is kind of boring. And second, it’s predictable. In the real world, systems do not behave exactly the same way each time they are run.
So let’s finally add some user input via the mouse. First, let’s listen for mouse movement.
System.init = function(opt_setup, opt_world, opt_supportedFeatures) {
  ...
  this.mouse = {
    location: new exports.Vector(),
    lastLocation: new exports.Vector(),
    velocity: new exports.Vector()
  };
  exports.Utils._addEvent(document, 'mousemove', function(e) {
    System._recordMouseLoc.call(System, e);
  });
};
Next, let’s add a recordMouseLoc() function.
System._recordMouseLoc = function(e) {
  this.mouse.lastLocation.x = this.mouse.location.x;
  this.mouse.lastLocation.y = this.mouse.location.y;
  if (e.pageX && e.pageY) {
    this.mouse.location.x = e.pageX;
    this.mouse.location.y = e.pageY;
  } else if (e.clientX && e.clientY) {
    this.mouse.location.x = e.clientX;
    this.mouse.location.y = e.clientY;
  }
  this.mouse.velocity.x = this.mouse.lastLocation.x - this.mouse.location.x;
  this.mouse.velocity.y = this.mouse.lastLocation.y - this.mouse.location.y;
};
We’re saving the last position, assigning location based on the passed event and finally calculating a velocity as the difference between the last and current location.
Notice we’re storing the mouse data as Vectors. Let’s put them to use. We’ll hijack our World’s gravity and make it proportional to our mouse location. First, turn off the wind.
function World(el) {
  ...
  this.wind = new exports.Vector();
  ...
}
Next, stop tracking the camera control item in system.init() in index.html.
system.init(function() {
  for (var i = 1; i < 11; i++) {
    system.add('Pebble', {
      index: i
    });
    if (i < 7) {
      system.add('Boulder', {
        index: i
      });
    }
  }
}, null, {
  csstransforms3d: Modernizr.csstransforms3d,
  csstransforms: Modernizr.csstransforms
});
Next, let’s update the World’s step() funciton.
World.prototype.step = function() {
  var dx = exports.System.mouse.location.x - this.width / 2,
      dy = exports.System.mouse.location.y - this.height / 2;
  this.gravity.x = dx * 0.01;
  this.gravity.y = dy * 0.05;
};
We’re getting the distance from the center of the viewport, multiplying it by a constant and assigning it to World.gravity.
Load index.html and start moving your mouse. Fun! The rocks gravitate toward your mouse. Play with the values to explore the effects.

At this point, your SimpleSim files should look like this:
Done
If you made it this far, you’ve got some stamina. Even better, you now have a framework to explore creating natural systems in a web browser. Play with the values. Create your own Classes. Load up your creations on mobile devices and make use of gyroscopes and accelerometers.
You can find the complete framework from this article at https://github.com/foldi/SimpleSim.
You can also view the example steps in motion at http://bl.ocks.org/foldi.
If you’d like an example of how far you can take a natural coding framework, check out FloraJS at http:www.florajs.com.
If you want to learn more, here’s some great resources on coding natural systems.
The Nature of Code - Daniel Shiffman
Vehicles: Experiments in Synthetic Psychology’ - Valentino Braitenberg
The Computational Beauty of Nature
If you’d like a more extensive Vector library, download it here.
Finally, you can follow me on Twitter.
Thanks!

Comments