JavaScript has exploded in popularity over the past few years. It’s now the number one language on Github, and getting more popular every day. This popularity plus the recent advances in HTML5 has meant an explosion in the number of JavaScript game engines out there. The JavaScript wiki lists over 80 game engines, where to even begin in choosing one?! Let’s not complain too much though, this is a great problem to have, HTML5 gaming has arrived!
Today we are going to compare three popular JavaScript game engines: CraftyJS, ImpactJS and LimeJS. You really can’t go wrong with any of these great choices, but they do have their own strengths, weaknesses and style. Taking some time to get to know what’s out there is well worth it before embarking on a game.
Why These Engines?
In short, because they are popular. Before embarking on this article I made a spreadsheet that calculated which JavaScript game engines are the most popular on Github; Lime and Crafty took the top two spots. I also decided to go with Impact for the third engine, even though it’s not on Github, due to it being commercial. Impact proved to be a good choice as it often takes a different approach on things from the other two, offering some nice contrast in the comparisons.
Breakouts, the “TodoMVC” of JavaScript Game Engines
JavaScript’s popularity hasn’t just meant an explosion in game engines, all kinds of JavaScript libraries are popping up. MVC type frameworks for rich internet applications in particular are a dime a dozen these days, which one to choose? Addy Osmani and Sindre Sorhus addressed this problem by creating TodoMVC. Basically, they gathered implementations of a simple todo application in many different MVC frameworks. TodoMVC has become a great resource for comparing and contrasting all these frameworks, and lets developers get a feel for which frameworks speak to them the most. This also comes with the added bonus of having a decent little application written in the framework of your choice to get you started.
I thought it’d be pretty cool if we could get a similar thing off the ground for JavaScript game engines. By implementing a simple, but non-trivial, game in as many JavaScript engines as we can, we can help people get a feel for which engine they like and which one meets their needs.
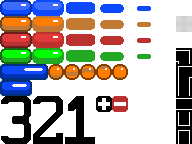
Addy and Sindre chose a pretty dull and straightforward application: a todo list. That was a good choice. The application itself is not the point, but rather the frameworks. I made a similar choice with the game engine comparisons, Breakout:

It doesn’t get much more boring or straightforward than Breakout! But really, this is a perfect choice here. Breakout is simple enough to easily wrap your brain around, but at the same time it involves player input, sprites, animation, menus, collision detection, power ups and sound effects. Not to mention, it’s a great launching point to extend and add more features to, should you want to get to know a specific engine even better.
The home for Breakouts can be found here.
Introducing the Engines
Crafty

Crafty is open source and was created by Louis Stowasser with contributions from many other people. Crafty is designed for 2D games and is generally tile oriented.
What stands out the most about Crafty is its component oriented design. Unlike the other two engines, Crafty does not use classes or inheritance. Instead, you define components, which can be seen as contained bundles of functionality. Then build up your entities by combining various components together. It’s a lot like using mixins in a language like Ruby. For example, in Breakout I found I needed to be able to get at the “edges” of a given component, its top, bottom, left and right. So to do this, I defined an Edges component that captures this:
Crafty.c('Edges', {
  // any entity that adds this component will automatically get this init method called
  init: function() {
    // give the entity some properties for its various edges
    Object.defineProperties(this, {
      left: {
        get: function() {
          return this.x;
        }
      },
      right: {
        get: function() {
          // now just do myEntity.right to get its right side instead of constantly adding x and w
          return this.x + this.w;
        }
      },
      top: {
        get: function() {
          return this.y;
        }
      },
      bottom: {
        get: function() {
          return this.y + this.h;
        }
      }
    });
  }
});
The c function defines a new component in Crafty. And the e function instantiates an entity, passing to it a list of the components the entity should have. For entities that I needed to get at their edges, I simply included the Edges component:
var paddle = Crafty.e('2D, Canvas, Edges, Paddle');
Don’t worry, only c and e have such short method names, not all of Crafty is single letter functions. Crafty’s API as a whole is nice and readable.
Notice the paddle entity also has three other components. 2D gives it functionality that is needed for living in a 2D world, such as x and y coordinates, while Canvas gives it the ability to be rendered to the display using the canvas element that Crafty is managing. Notice I also gave the paddle entity a Paddle component. This component defines all the functionality that is needed for an entity to behave like a Paddle. Paddle is a component I wrote myself as part of implementing Breakout in Crafty. You can also assign a component to an entity that doesn’t have an implementation, this is great for tagging and grouping entities.
At first I found the component system a bit peculiar, but I quickly grew to like it. It allowed me to organize the game cleanly and intelligently, and each individual component was simple and easy to write and maintain.
Crafty also has a very nice query system built into it that is a pleasure to work with. If you call the main Crafty() method and pass in some component names, Crafty will return you a collection of all entities that have those components. For example in Breakout, whenever the player finishes a level, I need to remove all of the balls that are in play before moving onto the next level. With Crafty, this is as simple as:
Crafty('Ball').destroy();
Here Crafty is digging into the game environment and finding all entities that have the Ball component. If the player collected two power ups, there might be 3 balls in the playfield. The Crafty method returns a nice collection where you can operate against all the balls in one fell swoop. Here, destroy() is having Crafty destroy all of the balls it found. This reminded me of jQuery and works rather well. Another good example is whenever the ball destroys a brick. If it was the last brick in the level, then the game needs to proceed to the next level:
if(Crafty('Brick').length === 0) {
  // all the bricks are gone, level complete!
}
This also gives you an idea of why you’d want to use dummy components to tag entities with. You could add a Monster component to all the monsters in your game then easily refer to them using Crafty('Monster'), even if the Monster component itself has no implementation at all.
Lime

Lime is open source and was created by Digital Fruit. Lime is built around Google’s Closure library, which proves to be a great asset. Closure is a feature rich and robust library that has been used to build things like Gmail and Google Maps. It offers a wide range of functionality from hooking into browser events to determining if two shapes overlap. Lime also ships with its own small python utility for creating new Lime projects, building and minifying JavaScript, and other similar tasks. This gives Lime games a nice structure and environment to work in, making developing with Lime pretty pleasant.
Lime is the most conservative feeling of the three engines here. Lime is extremely similar to Cocos2D, so if you’ve ever used Cocos2D you will feel right at home with Lime very quickly. Everything from the Director, ScheduleManager and Scenes to Layers, Nodes, and Actions are all here and almost identical to their Cocos2D counterparts. There are JavaScript ports of Cocos2D such as Ryan William’s cocos2d-javascript and Cocos2d-X’s Cocos2d-html5. If you are coming from a Cocos2D background, you might be tempted to give them a try. Which is perfectly fine, but I’d also highly recommend giving Lime a look. It gives you all the benefits and feel of Cocos2D, but is also the most popular JavaScript engine and is actively developed with regular releases. LimeJS also has a large, thriving community to get help from.
Lime is a very “safe” choice in that it will for sure be able to handle just about any 2D game you could throw at it. But Lime is also a bit tedious at times, and also sometimes very general. Lime can be seen more as a “game framework” from which you could build specific game engines on top of. One area that Lime really excels is its node graph. Just about everything in Lime derives from the base Node class, and nodes can contain child nodes. This allows you to build complicated entities that can have many children, yet address them from a high level. For example you might add a character node as a child of a vehicle node it is riding in. The character node might also have an armor node that he is wearing. Whenever the parent vehicle node moves, the character and his armor will move right along with it, making them act as a cohesive whole.
Impact

Impact was created by Dominic Szablewski and is a bit different from Lime and Crafty in a few key ways. For starters, Impact is a commercial engine requiring a $99 license to use it. This certainly places Impact at a disadvantage as the other two engines are free of charge. But Impact is a quality product. If you find that Impact meets your needs, you will probably find the money well spent.
Impact is also different from Lime and Crafty in that it’s a fairly specialized game engine. While both Crafty and Lime strive to be general purpose and ideal for just about any type of 2D game, Impact tends to specialize in 2D platformers and action games and has many of the things that action games would need baked right in. Simple “video game physics”, platform oriented collision detection, health for the player and enemies and other “action” oriented features are all there ready to be used in Impact. You can very quickly create a Super Mario Bros-esque platformer in Impact, but a puzzle game might be another story.
Thankfully, Impact is well designed and easy to extend. You can write plugins to extend the engine, or use plugins other people have written as well. This can add to the scope and capabilities of Impact nicely.
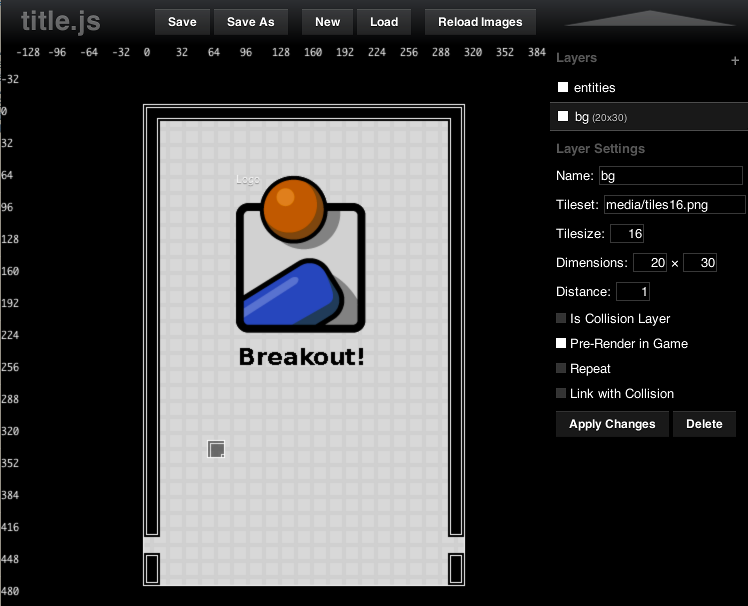
Impact also ships with Weltmeister, a very nice tile based level editor with collision layer support. Weltmeister means “champion” in English.
Impact is a very competent and high quality engine. But if you aren’t making a platformer, overhead game or other action type game, you might find much of what Impact offers you isn’t very relevant. This is definitely something to consider when looking at Impact.
… and now with the introductions out of the way, let’s dive into comparing these engines on some key areas of game development …
Preloading Assets
It’s usually best to preload your images and sounds before the game starts. That way when it’s time to use them, everything is ready to go with no gaps or pauses. Impact does a great job with this, making it almost entirely seamless to the end developer. In Impact, whenever you define an entity that has images or audio files defined as properties of the entity, Impact will make sure those assets are loaded before the game starts:
EntityBrick = ig.Entity.extend({
  // this audio file and image will get preloaded automatically be Impact
  deathSound: new ig.Sound('media/sfx/brickDeath.*'),
  animSheet: new ig.AnimationSheet('media/tiles.png', 32, 16),

  init: function() {
    // but be careful, Impact's preloader won't find this one as its inside a function, and won't preload it
    var someOtherSound = new ig.Sound('media/sfx/someOtherSound.*');
  }
});
Impact games automatically start with a loading scene which features a progress bar as your resources load, which you can customize if you like.
Crafty also helps out here, offering a preloader with Crafty.load(). But it’s a bit more manual than Impact and requires you to set up the loading scene yourself. If you add a new image to your game but forget to tell Crafty to load it, then your game will stutter a bit when it first starts using that image. Also, Crafty will happily preload your audio files, but it makes no attempt to decide which of the audio formats the current browser supports, so you either need to figure that out yourself or brute force load all of your audio files. For example in the Crafty Breakout, I am preloading all of the mp3, ogg and wav audio files when the given browser really only needs one of those formats.
Lime doesn’t address preloading assets at all; you’re on your own to find a solution. Since Lime games always have Google Closure available, one option is to use goog.net.ImageLoader, but this only addresses image files.
Rendering
Canvas is a great and obvious choice for browser based games, but it’s not the only rendering solution out there. All of the engines offer a canvas based rendering approach, but Lime and Crafty also allow you to render your game using DOM elements. By using absolutely positioned divs and CSS spriting, you can achieve a full fledged gaming environment and allow the browser’s highly optimized rendering pipeline to do the heavy lifting. This is exactly the technique that Christer Kaitila talked about in his DOM sprite article here at Build New Games.
Lime’s support for both DOM and canvas rendering put it at the head of the pack here. With Lime, all aspects of rendering are abstracted away and hidden inside Lime. You never have to make any canvas or DOM specific calls. The great benefit here is you can easily switch your game to use either a canvas or a DOM approach with one line of code.
Crafty also offers both DOM and canvas support, but it’s a bit more entrenched in your code. With each component in a Crafty game, you need to decide up front whether it will be DOM or canvas based. You are free to mix and match as you please, having some components be canvas based while others are DOM. I actually found with Crafty that canvas based components for most of the game but DOM based components for text gave me the best mix of performance and graphical fidelity. It’s easy enough to switch a component from DOM to Canvas, just have the given component pull in the rendering component of your choice:
// a Paddle entity that is DOM based
Crafty.e('2D, Dom, Paddle');

// a Paddle entity that is canvas based
Crafty.e('2D, Canvas, Paddle');

// a Paddle entity that can be toggled based on a variable
var renderingComponent = isUsingCanvas ? 'Canvas' : 'DOM';
Crafty.e('2D, ' + renderingComponent + ', Paddle');
The third approach is easy to do and gives you the ability to toggle your rendering easily. But the problem is, some methods you call assume one rendering component or the other. This is especially true with text based entities that need to style the text. To do this you call the css() method, which is only available for DOM based entities. Lime does a bit better here as methods like setFontSize() and setFontStyle() work in both Canvas and DOM modes.
Impact only offers canvas
Impact is completely based on Canvas and offers no support for DOM rendering at all.
Since Impact’s font rendering is bitmap based, it’s most common to use a pixelated bitmap font, that is not nearly as smooth looking as true browser fonts.
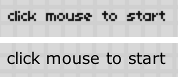
The upper text is from the Impact Breakout, while the lower is from the Lime version. However, this is also a matter of style and taste. Some could definitely argue that the bitmap fonts look and feel more “video game-like”, and I really can’t argue with that. Not to mention a bitmap font can have higher fidelity than what I used. But there’s no chance a bitmap font can meet the flexibility of what the browser’s text rendering offers.
Audio
This is the only category that has no “great” engine. This is mostly because HTML5 audio is still a bit on the rough side, and not necessarily the fault of the engines.
All three engines make use of the HTML5 audio element for sound effects, which is still a bit iffy in current browsers, especially on mobile devices. For both Impact and Crafty it’s very easy to specify which audio files to load, and play them with a simple play() method. Chrome is notorious for only playing an audio clip once, and there are various workarounds people have found to combat this. With Impact and Crafty, I never had to deal with that, they are handling this issue internally.
It seems Lime hasn’t addressed audio too much yet. The lime.audio.Audio class is a simple wrapper around the audio HTML element, and so all the warts and problems that come with the element are present in Lime’s Audio class too. In particular, it took some tinkering to get a sound effect to play more than once in Chrome with Lime. I contacted Digital Fruit (the folks behind Lime) and they let me know a lot of work on Lime’s audio capabilities have been taking place lately, it just hasn’t been merged into the stable releases yet. So Lime’s story on audio might change in the near future.
Tile Loading
It’s common for smaller, 2D games to be tile based. For Breakout I created a small tile set and used it for all the graphics in the game.
Truth be told this wasn’t necessary for such a simple game, but I wanted to see how these engines handle tiles in general.
Impact’s Weltmeister is a nice and rather feature rich level editor. You can easily load tile sets and draw with them to define your levels and backgrounds. Weltmeister includes layer support and will even preview how your parallax settings will look as you pan around. Weltmeister is easy to use and the levels it generates load seamlessly and trivially into an Impact game by simply calling loadLevel(SomeWeltMeisterCreatedLevel). A drawback to Weltmeister is it is proprietary to Impact. If you should decide to port your game to another platform, the levels that Weltmeister generates won’t be of too much use.
Lime has built in support for loading tmx files, which come from the popular Tiled tile editor. Although not a simple one line call like it is in Impact, it’s still pretty easy to get tiles loaded into a Lime game:
var tmx = new lime.parser.TMX('media/bg.tmx');

for(var t = 0; t < tmx.layers[0].tiles.length; ++t) {
  var tile = tmx.layers[0].tiles[t];
  var sprite = new lime.Sprite().setPosition(tile.px, tile.py);
  sprite.setFill(tile.tile.frame);
  this.appendChild(sprite);
}
And since Tiled is practically a standard these days in game dev, you gain the advantage of taking your levels with you wherever you go. Not to mention Tiled is a great tool in and of itself.
Crafty doesn’t really address loading tiles into your game. There is a Tiled plugin for Crafty, but I found it didn’t work well. Granted, taking that plugin and making it robust would not be much work. But if you just want to load tiles easily out of the box, Crafty won’t help you. Instead in the Crafty Breakout, I defined an array in code which specified the tiles for the background, and loaded the tiles that way:
    var bg = [
        [l,h,h,h,h,h,h,h,h,h,h,h,h,h,h,h,h,h,h,r],
        [v,g,g,g,g,g,g,g,g,g,g,g,g,g,g,g,g,g,g,v],
        [v,g,g,g,g,g,g,g,g,g,g,g,g,g,g,g,g,g,g,v],
        [v,g,g,g,g,g,g,g,g,g,g,g,g,g,g,g,g,g,g,v],
           // ... many rows omitted, 26 rows in total
        [b,g,g,g,g,g,g,g,g,g,g,g,g,g,g,g,g,g,g,b],
        [g,g,g,g,g,g,g,g,g,g,g,g,g,g,g,g,g,g,g,g],
        [t,g,g,g,g,g,g,g,g,g,g,g,g,g,g,g,g,g,g,t],
        [b,g,g,g,g,g,g,g,g,g,g,g,g,g,g,g,g,g,g,b]
    ];

    for(var y = 0; y < bg.length; ++y) {
        for(var x = 0; x < bg[y].length; ++x) {
            Crafty.e('2D, Canvas, background, ' + bg[y][x])
                .attr({
                    x: x * breakout.TILE_SIZE,
                    y: y * breakout.TILE_SIZE
                });
        }
    }
Animation
Lime’s animation support really shines. While Crafty and Impact only offer frame based sprite animation, Lime offers that as well as a full suite of animation actions that are very similar to what Cocos2D has to offer. For both Crafty and Impact, the “birth” and “death” animations of the bricks were accomplished using frame animation:


But for Lime, I was able to use ScaleTo to scale the bricks from zero to full size, and Lime scaled them up very smoothly. Setting up the ScaleTo animation was much simpler than getting the frames loaded and specifying how the frames should be animated as well. Lime also offers other animations like FadeTo, MoveTo, and many more. Lime also supports framed based animation just like Crafty and Impact.
Collision Detection
Breakout has surprisingly demanding collision detection needs relative to how simple of a game it is.
Impact provides a full fledged collision detection and simple physics system that is built right in. It’s not true physics in the same vein as Box2D and the like, but instead offers simple, “video game physics” that are ideal for games like platformers. If you want your entities to jump from platform to platform, bounce off walls, skid a little as they change directions while running, or have a floaty arc whenever they jump, then Impact can do all of that for you out of the box with very little effort on your part. Implementing the ball collisions for Breakout in Impact was trivial. The Impact version had accurate and precise collisions by just specifying a few configurations on how the ball and bricks should act when they collide. I also used Weltmeister to create a collision map, indicating that the ball should bounce off the walls. This greatly simplified the Impact version and made it the quickest of the three to implement.
Crafty ships with its Collision component, which is a really nice and simple way to determine if two entities have collided with each other. But the Collision component offers no help at all in determining what to do once the collision has happened. In many games, this is just fine. You often just want something very simple to happen upon collision: have the player take damage, have an enemy die, gain a power up, etc. But in the case of ball/brick collisions, you are on your own to determine how the ball should bounce off the brick.
Lime offers even less help here than Crafty does. With Lime, you can ask an entity for its bounding box and use goog.math.Box.intersect to determine if two bounding boxes intersect. That’s about all the help Lime is going to give you. If your game has many entities, it will be up to you to implement an efficient broad phase collision detection system, like the one Andrew Petersen talked about in his article.
To be fair, both Lime and Crafty are very compatible with the Box2D physics engine and in many games today, you would offload all collisions and reacting to collisions to Box2D. So in many situations, the fact that Crafty and Lime have not addressed collision detection too much is perfectly fine. It’s also easy to integrate Box2D into Impact games.
Mobile Support
I originally wrote all of the Breakouts with desktop browsers in mind. I later went back and made them work on my iPhone 4. My iPhone is the only mobile device I reliably had available for this; so keep that in mind, these games have not been tested yet on Windows Phone, Android or any other devices.
What really affected the Breakouts running on the iPhone was the tiled background. Altogether, there are 520 tiles that make up the background. On Lime and Crafty, this translated into 520 individual elements, which really hampered the performance on the phone quite dramatically. Neither the Lime nor Crafty versions of Breakout were at all playable in this state. For Lime, I replaced the background tiles with one prerendered image, and for Crafty I told it to skip the inner tiles and only add the walls when running on the phone. These tweaks improved the performance of both versions enough to make the game playable.
I had some trouble getting the Crafty version to work at all on the phone at first. It took some digging and searching the web to find a solution. When Crafty detects it is running on a mobile device it attempts to set your game up to work on the smaller screen. I found a post on the forums that suggested turning this off by setting Crafty.mobile = false before launching the game, and then manually do the work needed to display the game on a phone properly. Once I did this, the Crafty version started working well.
With Impact’s Weltmeister, you can set a prerendered flag for a given layer. I did this for the background layer, which causes Impact to render all of the tiles into one buffer, then use that buffer from there on out instead of individually rendering every tile each frame. Essentially Impact is automatically doing for me what I manually did in the Lime version, replacing the 520 tiles with one static image. This meant the Impact version performed very well from the get go on the phone.
Impact further impressed me by taking the mouse events I had coded for and seamlessly translating them into touch events. For the Impact version of the game, no changes to the main code were needed at all to work well on my phone. I struggled a bit to get the Lime and Crafty versions working on the phone, and in the end the performance was still a bit disappointing. But the Impact version had no problems here at all.
It’s also worth point out that the creator of Impact also made Ejecta, which lets you run JavaScript games on iOS devices using OpenGL based rendering for much improved performance and better native integration. It’s clear the Impact author considers mobile gaming a priority, allowing Impact to really shine in this category.
Deployment, Building and Minification
Since Lime uses Google Closure, games written with it can easily be passed through Google’s Closure Compiler for minification and obfuscation needs. Even better, it’s easy to take advantage of Closure Compiler’s ADVANCED_OPTIMIZATIONS mode, and reduce the size of your JavaScript dramatically. For the Lime Breakout, when using Closure Compiler in standard mode, the resulting JavaScript file was 264k, but with advanced optimizations turned on, it reduced to 71k. Even better, this is simple to with Lime by just calling bin/lime.py and invoking its build functionality.
With Lime, your game can take advantage of Closure’s namespacing and dynamic loading. This simplifies development, and allows you to segregate your game’s pieces into logical namespaces easily, but still minify down correctly with no effort on your part.
Impact has its own homegrown module and build systems. They get the job done, but are not as nice as Google Closure. With Impact, you ideally should follow some conventions to use this system to its fullest. For example, the power up entity in Impact needed to be named EntityPowerUp, be defined globally (ie, directly on the window object), and located at lib/game/entities/power-up.js. The name of the type (EntityPowerUp) and the name of the file are important for Impact and Weltmeister to be able to accurately work with it. This isn’t a big deal to be honest, and the imposed structure could be seen as a good thing too.
Impact also ships with a script which will build and minimize your JavaScript for production. It uses its module system to determine dependencies and what needs to be added to your minified build. This works well and is as easy as invoking bake.sh from the tools directory. But one complaint is the javascript is mostly just concatenated together and whitespace removed. No obfuscation, variable renaming or dead code removal takes place. It is easy enough though to take the result of bake.sh and run it through another minifier.
Crafty, on the other hand, does not address this at all. Crafty itself ships as one JavaScript file, Crafty.js, and it’s entirely up to you to decide how to organize your game, how to section it into namespaces and modules, and how to deploy it for production. This can be seen as a pro or a con, depending on how you look at it. Using RequireJS or LMD or any other module system with Crafty is easy to do, and you are free to choose the one you like best. Same goes for minimizing your game’s JavaScript.
Wrapping Things Up
So which engine is the real winner? I will leave that to you to decide. Since Lime and Crafty are free and open source, it’s easy to dive into them and give them a whirl. Impact is at a disadvantage here, as you need to pony up for the license before you can start playing with it. It’d be nice if Impact had some sort of trial period option.
One lesson I learned while working on this article is that taking the time to implement a simple game like Breakout in various engines can be very enlightening. I highly recommend taking the time to implement something simple – even pong – in the engines that have captured your interest. You’ll come away with a much better feel for these frameworks and will make a much more intelligent decision that will pay off later. And hey, if you explore some engines and want to implement Breakout to try them out, please consider contributing your implementation to Breakouts to help spread the wealth amongst the HTML5 game dev community.
If you do anything with Breakouts I’d love to hear it! Please hit me up on Twitter or at the Breakouts website.

Comments