Building cross-browser, cross-device games for the open web does not have to be a tedious process. In the last week of March 2012, Bocoup held an 8-hour hackfest for its employees, during which time I built a cross-device multiplayer game that works on Firefox, IE 6+, Chrome, Opera, Safari, iOS, Android, and Windows Phone 7. Granted, the game is probably not what you’re imagining when you think cross-device multiplayer game, but the point of this article is that properly chosen constraints can help you develop really cool things in a very short amount of time.
Defining the project
Sometimes you choose your constraints, and sometimes your constraints are given to you. The primary goal for this project was to develop a game that could be played at JSConf. I knew that I only had 8 hours to develop the game, so I knew that I would have to keep things as simple as possible. Whenever I’m not working with an artist, I try to go for something minimalistic, but visually striking. That way my lack of artistic skills can be masked by the striking design. The first thing that came to mind was Paper.js, an “open source vector graphics scripting framework that runs on top of the HTML5 Canvas.” Their examples gallery is full of smoothly animated, stunning demos.
My favorite Paper.js demo has always been their most basic: the Chain demo is just a simulation of a rigid-body chain, rendered as a kind of noodle that you control by moving the mouse. Even though there’s no game to it, it’s fun to play with the demo for one or two minutes and see how the noodle reacts as you move it around and fold it back in on itself. I figured this would be an excellent starting place for a simple game: when the basic act of movement is something that makes you smile, it only takes the barest of game mechanics to create a compelling experience on top of it.
Once I decided to go with the Chain demo as a starting point, the gameplay suggested itself: Snake, the classic game where you control a snake trying to eat little powerups, growing longer and longer as you progress.
Next up, I had to consider the environment the game would be run in: a large lecture hall with a projector. I was inspired by Renga, a game by wallFour meant to be played by hundreds of people with laser pointers that I saw demonstrated at the Experimental Gameplay Session at the 2012 Game Developers Conference. Building off of Renga’s core concept, the game would happen on the projector, and audience members would play using a client they load on their laptop or mobile phone.
The initial vision for the game was simply Snake, but collaboratively controlled by the entire audience. The audience would be presented with up/down/left/right controls, and the snake would average out everyone’s contribution to its velocity vector and move in that direction. For example, with 6 people voting up and 1 person voting right, the snake would move mostly up with a slight drag to the right. One thing this meant was there would be no movement grid as you would find in traditional Snake. All the better, as that’s one more thing I didn’t have to code!
I decided to call the game Team Snake, because I am not good at naming things.
First steps
The first step in building the game was to get basic movement working. This was easy enough. I used Greg Smith’s keyDecode library to handle input, and created a simple “x += velx” style velocity model, binding arrow keys to their appropriate velocity values. I made sure to write it so that multiple presses of a single arrow key counted as an additonal “vote” in that direction, to simulate the experience of multiple people controlling the snake.
Here’s a simplified version of the velocity code, stripping out all of the snake/chain simulation stuff:
    var speed = 1;
    var velx = 0;
    var vely = 0;

    // onFrame is a function in Paper.js that once per animation frame, and segments[0] is the 'head' of the chain
    function onFrame(e) {
      segments[0].point.y += vely;
      segments[0].point.x += velx;
    }

    // keyboard code, uses jQuery and keyDecode
    $(function() {
      $(document).keydown(function(e) {
        console.log(keyDecode(e));
        key = keyDecode(e);
        if (key == "up") {
          vely -= speed;
        }
        if (key == "down") {
          vely += speed;
        }
        if (key == "right") {
          velx += speed;
        }
        if (key == "left") {
          velx -= speed;
        }

        if (!e.shiftKey && !e.ctrlKey) {
          e.preventDefault();
        }
      });
    });
To get the cumulative ‘voting’ feel, you’ll notice I added speed to velx or vely with each button press, rather than setting them equal to speed as I would normally do. Here’s the result (tap the arrow keys to control):
Building the network infrastructure
Now that I had basic movement working, the next step was to get the client/server setup working over the network. Based on the vision for the project stated above, the network topology would look something like this:
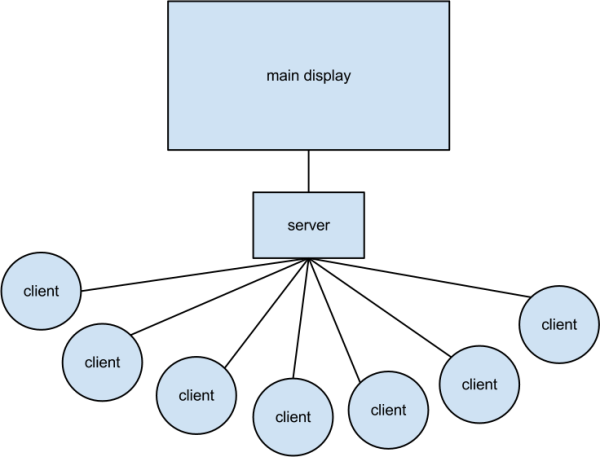
The client is the player, making their up/down/left/right choices. The server tallies up their votes and communicates to the main display, a specialized client that actually renders the game and reads the velocity votes, calculating the position of the snake locally.
I had one overriding goal for writing the netcode: keep the client as dumb as possible. I wanted the client to run on as many devices as possible, so keeping it simple clientside would be key to the project’s success.
Next I had to choose what technology to use for client/server communication. For Team Snake, communication over the network is just a bunch of clients constantly updating their state: “I’m voting left! Now I’m voting down! Now left again!” The server has to interpret these changes as fast as possible and send the vote counts to the main display. As such, an event-driven non-blocking platform like Node.js made a lot of sense. For communication, Node plays well with Socket.IO, a great library that lets you communicate via WebSockets with tons of fallback protocols. Socket.IO is compatible with basically every web browser you can imagine, so it was the obvious choice for this game given that I wanted the client to run on all sorts of devices. Finally, I chose to use the Express web framework to serve the game, mostly because I find it convenient to serve a small app entirely from the same Node service.
Building the client was very easy: simply include the Socket.IO client library, open up a connection to the server, and when the user presses a direction button, emit an event to the server saying so. I also have some code where, upon connection, the server assigns a client number – this is to keep track of who is voting so there aren’t multiple votes from the same client. That client number is sent to the server with each event.
<!DOCTYPE html>
<html>
  <head>
    <script src="/socket.io/socket.io.js"></script>
    <script>
      var socket = io.connect('localhost');
      var clientnum = -1;
      socket.on('clientnum', function (data) {
        console.log(data);
        clientnum = data;
      });
    </script>
  </head>
  <button onclick="socket.emit('up',clientnum)">UP</button>
  <button onclick="socket.emit('down',clientnum)">DOWN</button>
  <button onclick="socket.emit('left',clientnum)">LEFT</button>
  <button onclick="socket.emit('right',clientnum)">RIGHT</button>
</html>
The server isn’t that much more complex than the client. First, I initialize Express and set up the routing for the main display, the client, and the two JavaScript source files I’m including.
var app = require('express').createServer()
  , io = require('socket.io').listen(app);

app.listen(80);

app.get('/', function (req, res) {
  res.sendfile(__dirname + '/index.html');
});

app.get('/client.html', function (req, res) {
  res.sendfile(__dirname + '/client.html');
});

app.get('/js/paper.js', function (req, res) {
  res.sendfile(__dirname + '/js/paper.js');
});

app.get('/js/keyDecode.js', function (req, res) {
  res.sendfile(__dirname + '/js/keyDecode.js');
});
Next, I initialize the clients variable to 0. When a client connects to the server, I increment that value, then send back clients so that the client itself now knows what its local client number is. Finally, I set up the socket to listen for the up, down, left, and right events, which simply broadcasts a velchange event containing a velocity vector and the client number.
var clients = 0;

io.sockets.on('connection', function (socket) {
  clients += 1;
  console.log("Clients: " + clients);
  socket.emit('clientnum', clients);
  socket.on('up', function (data) {
    socket.broadcast.emit('velchange', {velx: 0, vely: -1, client:data});
  });
  socket.on('down', function (data) {
    socket.broadcast.emit('velchange', {velx: 0, vely: 1, client:data});
  });
  socket.on('left', function (data) {
    socket.broadcast.emit('velchange', {velx: -1, vely: 0, client:data});
  });
  socket.on('right', function (data) {
    socket.broadcast.emit('velchange', {velx: 1, vely: 0, client:data});
  });
});
Finally, the main display itself, which you’ll recall actually updates the snake’s position, contains code that listens for the velchange event, storing it in a variable called vectors that contains one velocity vector for each client, ensuring one vote per client.
socket.on('velchange',function(data) {
  console.log(data.client);
  vectors[data.client] = [data.velx, data.vely];
});
The following code appears in the onFrame function that Paper.js runs each frame. It recalulates the overall velocity every frame by tallying up the votes from each client stored in vectors:
function onFrame(e) {
  velx = 0;
  vely = 0;
  for(var i in vectors) {
    velx += vectors[i][0];
    vely += vectors[i][1];
  }

  // ..rest of onFrame update code goes here
}
You can grab the demo from this Github repo and try it yourself (installation instructions for various dependencies are available in the README, requires Node/NPM).
Playtesting
Once I had this simple demo running, I tested the game multiple times with about half a dozen coworkers playing. This resulted in numerous changes, including:
- Subtle changes to the voting mechanic to prevent a snake from getting too far off in one direction
- A second snake and scoring mechanism so clients are be assigned teams and can compete
- Visualization of the votes as component vectors on the snake itself, so the players in the audience could see how many votes are moving the snake
Conclusion
A concept that I’ve heard a lot about at game industry conferences is “the design space.” Imagine a big space that repressents all the possible game designs that are out there: that’s the design space. Every time we design a game, we’re exploring part of that space. What’s so exciting about the Open Web is that for years we’ve been stuck in the design space that’s afforded to us by traditional PC and console development. The Open Web gives us the chance for things like cross-device connectivity that allow us to make relatively simple games that explore new spaces: we just need to be willing to start thinking of what sort of game designs are afforded by our various devices.
My hope is that this article serves as an inspiration to those who want to explore the design affordances of the Open Web. I encourage you to think beyond symmetrical multiplayer experiences, games with a single rendering view, and traditional modes of input. The Web is a beautiful and fascinating place, almost terrifying in the possibilities it brings: modern web games should embrace those possibilities for interaction, and modern web technology allows us to do it.
The Final Game
If you want to try the final version of the game, point your web browser here and then go to http://teamsnake.herokuapp.com on your mobile device, or even just another browser window. The game is designed to be played in a single room, so grab a friend or coworker and have them play along on their mobile device too!

Comments