Knowing how to get from point A to point B is something many games require. Whether you’re designing a deep turn-based strategy tactics RPG or a simple puzzle game, navigating your game world often requires more intelligence from your game characters than merely pointing towards a goal and moving in a straight line.
You wouldn’t want the units in your game to walk through walls. Nor would players permit units to bump into walls and get stuck when a way around an obstacle is clearly visible. There’s nothing more frustrating than a real time strategy game’s units being unable to make their way to a target location.
This is where pathfinding algorithms come in. Pathfinding is the basic building block of most game A.I. (artificial intelligence), and with a little help from the proper code your game will be that much smarter for it.
To get to their goal, your game entities may have to walk around obstacles, find their way though a dungeon maze or drive around the city streets. It isn’t enough to eventually arrive at the destination via some frustratingly circuitous path - the route they take should be the shortest possible route.
Solving this problem isn’t a trivial task, but it is worth the effort. Enemies that choose wisely can often appear nearly intelligent. Your players will appreciate that things “just work” and will be able to focus on strategy and tactics instead of worrying about having the babysit broken AI.
The standard method that a majority of games use for pathfinding is called A*, which is pronounced “a star”.
The Origins of Pathfinding AI: Dijkstra’s Algorithm
In the fifties, a mathematician named Edsger Dijkstra worked out a method for calculating efficient routes that could be applied to any hypethetical situation requiring an automated choice between many possible steps.
It is often used in the example of trucks going from stop to stop over long distances, when shipments had to be picked up from various locations along the way. Choosing the most efficient route would save money.
The animation above is a typical example of it in action. Note that each node isn’t set on a game-like grid but it could be if we wanted. This is the perfect example of what we want to do: we add up the “costs” of each route and choose the one that costs the least. Cost, in terms of game pathfinding, is the distance travelled.
If you watch the above animation, you’ll see that each time we arrive at a new node along the way, we add up the cost of each possible route from there and proceed toward the one that costs the least.
The Problem With Dijkstra’s Algorithm
Dijkstra’s algorithm works great, but has the drawback of being naively implemented - it doesn’t use any special heuristics for choosing the most likely candidates first, and so the solution is only known after each and every possible location is tested.
In the animation above, you can see that each and every “cell” or “node” in the graph is being tested. It arrives at the proper outcome, but the computer programmer in you is probably thinking, “needs to be optimized!”
A-star pathfinding to the rescue!
A-star is a faster and more efficient version of Dijkstra’s algorithm. WikiPedia defines A-star as a “best-first, graph search algorithm that finds the least-cost path from a given initial node to one goal node”.
Put another way, A-star traverses a node graph (a collection of points in space that are connected) and finds the path that costs the least (is the shortest) without having to visit every single node in the entire graph. In the case of a videgame, this “node graph” is the game world; the map our units move around in.

In the animation above, you can see that the same game world is presented as seen in the previous Dijkstra’s example, but this time fewer nodes are checked. The result of these optimizing heuristics is that the function will run faster. In games, this is always preferrable.
Gamedevs Love Optimization
With a few more optimizations, we can do even more guesswork and therefore do even fewer calculations. By assigning weights to the nodes visited along the way, we can predict the direction we should try next.
What we mean by this, is that by using some more agressive heuristics, we are able to predict what the most likely best direction to move is and try it first.

In the above animation we see a very efficient example of an A-star algorithm that tries to guess the best route along the way instead of starting from scratch each time the route is blocked. More complex geometry would render this less obvious, but overall you can see that this is a good way to proceed.
This is exactly what most games need for their enemy AI. The ability to find the shortest route from point A to point B, and a game engine that can calculate this fast enough to run smoothly.
Don’t be Intimidated By All This Math!
Before you bother to dive head-first into algorithm heaven, or (worse still) ragequit from the sheer mathtastic enormity of it, just know that what we’re going to do today is create a few functions that do the job for you.
They will traverse a graph (a linked list tree-like structure of data that is the map of your game world) and add up the cost (in distance travelled) of many potential routes. The path that costs the least will be the shortest way from point A to point B.
The function we’re about to write will simply output an array of x,y coordinates that is the best route to use to get to the destination. Sound handy, doesn’t it?
A Simple Demonstration
Before you code the pathfinding algorithm, we need a visual representation of our game world. Yours will be much more complex, of course, but assuming you are using HTML5 canvas to render your game this will be familiar (and easy to rip out if you just want to drop the A-star algorithm into your existing game).
We’re going to keep things simple and first whip up a very basic random “world” that is rendered using a spritesheet on an HTML5 canvas element. The only canvas drawing function we’re going to use is drawImage.
The Spritesheet
For this simplistic demonstration, we only need a few sprites. Instead of tons of tiny files, they’re all packed into a single image as per standard best practises. We need a tile for blank walkable ground (grass), a tile that represents blocked areas (boulders), and a sprite each for the start, end and path tiles.
This is the spritesheet that our example world will be drawn using:
![]()
The HTML File
Let’s start coding! To begin, we’ll create a basic HTML5 page that contains nothing more than a label, the canvas, and a button that will generate a new random world. Simplicity itself.
The Javascript File
That’s all the HTML we need. The rest of this tutorial takes place in the land of javascript. In a new javascript file that we’ll call astar-pathfinding-canvas.js, begin by adding the following:
In the code above, we define the variables needed to hold the data that represents the world and references to our canvas. The world variable is a two-dimensional array (an array filled with arrays).
This way, you can set world data in the form world[x][y]=something; each number stored in this array will represent the index of the spritesheet tile in use at that particular location.
We also define the size of our world and placeholder path data that will change during the A-star demonstration.
Finally, we add a tiny bit of code to account for any browsers that don’t support the debug console. This code will allow us to add debug log entries that are output during execution if needed which are silenty ignored if such functionality is not present.
The next step is to handle initialization once the page has loaded.
Initialization
The onload function above grabs a reference to the canvas element in our HTML, sets the size to fit the world defined above, and starts listening to mouse clicks on the canvas.
We also load a .png image file (the spritesheet). In the code above we use a data URL so that no external files are required, but in your game you will likely just want to download a normal image file.
The next step is create a random world to navigate.
In the code above, the loaded callback is run once the spritesheet .png file is ready for use. We immediately begin the creation of our game world by running the createWorld function.
We first iterate through each x and y coordinate and set the world array value to zero (grass).
Once we create a fresh, completely walkable grassy plain, we scatter a few boulders here and there to provide obstacles for our intrepid adventurer to navigate.
Finally, we choose two random locations on the map to be the start and end positions, and calculate the soon to be defined A-star algorithm. If the path is impossible, we try another one until we have a good starting setup.
Advanced Terrain Generation
Naturally, you could devise a much more interesting world generator than this. You could use perlin noise or a pseudo-random number generator for deterministic terrain using seed values.
Instead of randomly scattering things around, you could use a cellular automata approach to create globs or clusters of similar terrain, so that trees group together into forests and clearing and rocks group together as mountains and valleys.
This is a fun thing to work on and is left as an exercise for the reader. If you want to learn more about random terrain generation, a great gateway to an infinite variety of interesting algorithms can be found by doing a little googling for terms such as roguelike dungeon generator, procedural terrain or random map generation.
Rendering The World
The next step, now that we’ve filled the world array with data, is to actually draw it on the screen.
In the code above we simply iterate through the world array and use the canvas element’s 2d context function drawImage to copy pixels from our spritesheet to the canvas at each tile location.
The next step is to render the path on top of the world, drawing additional sprites for each x,y coordinate stored in the currentPath array, which we calculated in the step above.
The World So Far
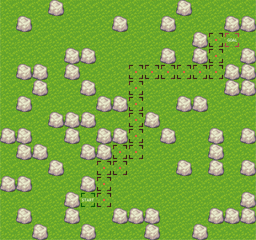
Here’s what we have so far - just a simplistic terrain generator. Grass that your game avatars could walk on, and some big boulders that will get in their way. Good enough for a pathfinding demonstration.
Click the NEW WORLD button a few times to see our fantastic terrain generator in action. Note that in the demo above, so we could see what’s been coded so far, the A-star related code is commented out so there are no errors due to the missing functions we’re about to code below.
Responding To The User
Now that we have a game world, we should add some interactivity. We need to code a mouse click event that figures out which tile on the canvas was clicked. We do so by first determining where in the html page the canvas resides, and then which tile in that canvas is under the mouse cursor, as follows:
To keep things simple, each click will be the next goal location for our pathfinding algorithm. The previous endpoint will be the new starting point. This way, we can take our game entity for a walk.
The routine above handles the idiosynchracies of cross-browser mouse position events and translates page coordinates in to canvas specific coordinates, which is important if your game is located somewhere other than at 0,0 on the web page.
Once we have the pixel location that was clicked, we simply divide by the size of the tiles so we know which world tile we clicked.
We then run the A-star routine again, after turning the previous turn’s end position to the next turn’s starting point. This way, each click results in the path going from the previous location to the new one, much like how units in a strategy game might continue moving over successive turns.
Now that we have a world generator, a rendering function, and user interactivity accounted for, the last step in this tutorial is the one we’re all here for: the pathfinding routine.
The A-star Algorithm
All that remains is the real meat of this tutorial. The A* algorithm. Some of this is a bit daunting, but if you think of it as a game in itself, pathfinding algorithms can be great mind candy. There’s something really cool about being able to find your way out of a maze, escape a dungeon, or march your armies toward an enemy castle.
We are going to create one large function called findPath(). To keep your game’s codebase clean, and to allow you to easily rip the algorithm out of this demo and use it in your game with ease, all functions it requires are going to be nested within it. Simple but effective.
Alternate solutions might place each function in a different scope, or could involve a class factory or singleton, but for pure copy-n-paste goodness, this method can’t be beat.
This means that if you need an A-star pathfinding routine with no dependencies that exists as a single block of code that doesn’t touch the global namespace with any temporary variables, you’re going to love this design. Just copy-n-paste and get on with the fun stuff.
Because we’re doing it this way, all of the following code snippets are continuing inside that one function. We’ll just break it into manageable chunks since the entire routine is around 250 lines. To begin with, we define the function and the parameters it expects, as follows:
In the code above, you can see that we ask for a two dimensional array of numbers that is a reference to your in-game map. It uses the same format as the world map array in the terrain generator above, so we can just pass it unchanged.
The other two parameters are a starting location and destination location in this world, formed as an array of two numbers, the x and y coordinates.
The first few lines speed up our routine by storing flattened references to commonly used Math.* functions. This is just a simple optimization that also makes the code slightly smaller.
We then define the largest world array terrain tile number that your game characters will be allowed to walk on. In our example, only the grass tile (tile number zero) is walkable, but in a real game you could assign the first few dozen tiles as ground or street and the rest as walls, so change this to whatever sprite number you require.
Finally, we set a couple references to functions that we’ll define below regarding distance calculations. Which ones we use depends on how you want the pathfinding to act with regard to diagonals and corners of blocked tiles. Simply switch out the distanceFunction and findNeighbours function with the ones you need, as shown in the commented-out examples.
Calculating Distances - Which Heuristic to use?
Before we begin comparing map tiles, we need to decide which heuristic to use. In this demo, we’ve kept things simple and force the character to only move along the four cardinal directions (North, South, East, and West).
Calculating distances this way is called the Manhattan distance, which refers to the grid-like structure of some parts of New York’s city streets. There are a few ways to calculate distances when considering diagonals.
The first is to just call a diagonal move 1 space, with the same cost as a NSEW move, which is called DiagonalDistance in the code. The alternate, more correct way to measure diagonal distances between tiles is called EuclideanDistance. This uses pythagora’s theorem to measure the true distance, which is about 1.4 times as far as between NSEW neighbours.
However, if your game units can’t move diagonally, you definitely want to measure using Manhattan. The choice is yours.
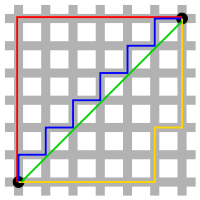
The image above shows the difference between these two types. The green line is Euclidean distance (of around 8.5 units), and all the others are Manhattan distance (of 12 units).
The Distance Functions
Continuing with our findPath code block, let’s start defining all of the possible distance functions you may need to use. In your game, you need only define the one it requires.
Free Diagonals or Not?
Optional functions are also included in the source to allow diagonal movement, and also whether or not you think it permissable to fit through the cracks that would be found between two adjacent blocked tiles that are diagonal to each other.
For each type of movement heuristic, there are two variants in the code: FREE and normal (with no suffix).
Normally, if two blocks were next to each other on a diagonal, the point where the two corners meet is not wide enough to walk through. Using the FREE variants means your units will be able to squeeze through this infinitessimally small crack between the two walls.
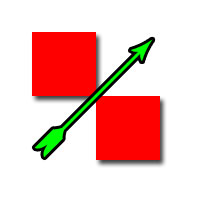
In the image above, the green arrow shows what we mean by FREE diagonals or not. If you CAN pass through the crack between the two red blocks, the heuristic you use for diagonal movement should be one of the FREE variants. If not, then use one of the normally named ones.
Determining What The Neighboring Tiles Are
Next, let’s create the functions that determine which neighbors each node has.
This depends on how we handle diagonal movement as explained above, if you’re not going to use FREE diagonal movement you don’t need to include the code with the FREE suffix.
Continuing inside our findPath code block, add the following as required:
Determining if a Tile is Walkable
We’re now ready to create the support functions for our final A-star routine. Firstly, a simple one that tells us whether or not a particular node is walkable.
In the code above, we simply perform a sanity check and if that array index exists we ensure that the number stored there is less than or equal to the maximum tile index that is allowed to be walked upon, which we defined at the very beginning.
Storing Path Costs During Processing
Next, we need to create temporary objects that are used to store costs and shortcut array indeces during processing.
The A-star algorithm below is going to create lists of these Nodes as required, and will fill them with costs that are added up by traversing all the routes we check along the way.
These node objects will form a linked list because each holds a reference to its parent node. They also hold the x and y position, the distances from the start and end points, as well as a array index used to speed up calculations.
A-Star Is Born
Finally, the A-star algorithm itself. This is the final block within our findPath() function.
You can follow along with all the comments. Basically, we fill a couple linked lists with Node objects that contain the world map data value and room to store distances along the way.
Note that this A-star implementation expects the world array to be square: it must have equal height and width. If your game world is rectangular, just fill the array with dummy values to pad the empty space.
As described in the optimization section above, we try to first search routes that appear to be most likely to lead towards the goal. We keep putting Nodes into each of the arrays depending on the cost (distance) to get there. When the open list is empty, we know that the path with the lowest cost is in the result array, ready for final output.
Starting with the initial node, which is the starting point we passed to the findPath function, we use a list or queue of nodes that still need to be considered.
This is the Open array. The Closed list (which contains nodes we’ve already checked) is used to make the search more efficient.
Along the way, we take the distance already traveled into account; the Node’s g property is the cost from the starting point and the f property is g plus the heuristic cost estimate from here to the destination.
The lower f a node has, the higher its priority. Each step, the one with the lowest f value is removed from the queue, the f and g values of its neighbors are updated, and these neighbors are added to the list, ready to be traversed.
We continue until a goal node has a lower f value than any node in the queue (or until the queue is empty).
This is the stuff of computer science master’s theses. Don’t feel bad if it seems a bit convoluted and complex: it is! All you really need to know is that you can now drop this function into your own game and reap the rewards of all this science and math. Standing on the shoulders of giants, so to speak.
Ready? Set? Go!
Lastly, now that we’re created a host of embedded functions within the one findPath() routine, we can start running A-star and return the result to our game.
Now, whenever we want our in-game AI units to navigate some terrain we simply call findPath() and pass in our world terrain array and a start and end coordinate.
The example of how this function should be called is in the canvasClick function above. Basically, you just call currentPath = findPath(world,pathStart,pathEnd); and you get an array of [x,y] coordinates.
In a real-world game scenario, you might want to limit the distance travelled each turn. For example, in a tactics game you might only allow the player to move six squares per turn. You would do this by simply stopping movement partway though the path by only using the first few array items as required.
The possibilities are endless. The fascinating gameplay mechanics you can come up with now that you have reliable pathfinding on a grid are infinite.
The Final Result
Here’s the full demo in action. Click around the map and notice how the shortest possible path is calculated (if one’s possible). Imagine the possibilities for your next strategy, tactics, or puzzle game!
That’s it! You can save yourself the trouble of copy-n-pasting all the code from each individual section of this tutorial by downloading the entire source here.
A Real-World Example
Just for fun, you can see a working example of this exact codebase used in a real videogame. I thought it would be fun to design a puzzle game around the A-star algorithm. The game took me only a few hours to create over the course of a weekend game jam. It is called “Pathos” and I invite you to try it out. Is uses the code from this tutorial. Check out PATHOS here!

I hope you enjoyed this tutorial. Armed with some simplistic AI movement, your games will benefit from strategic thinking, units that can find their way to their targets, and all sorts of interesting possibilities for strategy, tactics, and puzzle games.
Good luck with your future game projects. YOU CAN DO IT!
Kind regards,
Christer Kaitila
aka McFunkypants
P.S. I’d love to hear from you if you end up making a cool new strategy, tactics, RPG or puzzle game using this code!
My blog: http://www.mcfunkypants.com
Google+: http://google.com/+ChristerKaitila
Twitter: http://twitter.com/McFunkypants
OneGameAMonth: http://www.onegameamonth.com/McFunkypants

Comments