When it comes to creating games, I am more comfortable slinging code around than creating the visuals. I am always interested in techniques that fall within my comfort zone yet boost my game’s graphical umph. Particle systems are one such technique. By creating a small physics system that throws around hundreds – even thousands – of tiny little particles, awesome visual effects like smoke, fire, sparks, rocket exhaust and many more can be created. They are simple to create and really add nice visual effects to your game. Not to mention particle systems can be given physical properties and participate in your gameplay. In this article we’re going to walk through many of the details and considerations in a typical 2D particle system.
Above is a particle system configured to look like a meteor. You can pick from several other particle systems from the dropdown as well. In all cases the same engine is driving the particle systems, just using a different configuration each time. It’s pretty nice that one system can produce such a variety of visual effects!
Despite their slightly intimidating name, particle systems are very common these days and simple in concept. Most game engines have particle systems baked in. Unfortunately for HTML5 game engines, this often isn’t the case. This is partly due to most HTML5 game engines being a bit on the young side, but also and due to the fact that historically canvas has not been performant enough. In modern browsers, canvas’s performance has improved quite a bit, and adding particle effects to your HTML5 game is pretty doable (but there are performance considerations, see the performance section below). Even if your favorite engine of choice doesn’t include built in support, it’s easy to roll your own. We’ll start with a very naive system that gets the basics down, then talk about more interesting features that are commonly found.
A quick note, the particle system engine used throughout the article is heavily inspired by Cocos2D’s particle system implementation. Even the above examples should look pretty familiar to Cocos2D users. I thought due to Cocos2D’s popularity, it made sense to follow closely to what they’ve done. So a quick shout out to Cocos2D, thanks guys!
A Naive Particle System
To begin our simple particle system, let’s define a Particle type. We need to know where the particle is and where it’s headed; in this respect, a particle is not much different from any other entity in a game. We also want each particle to only live for a certain amount of time. So with that in mind we can start out with:
Nothing too exciting going on here, but it’s worth pointing out that the constructor takes an angle (in degrees) and a speed (in pixels per second) and converts these values into a velocity vector. This is intentional, when setting a particle up it’s easier to work with an angle and a speed. But when updating the particle each frame, it’s easier to work with a velocity vector.
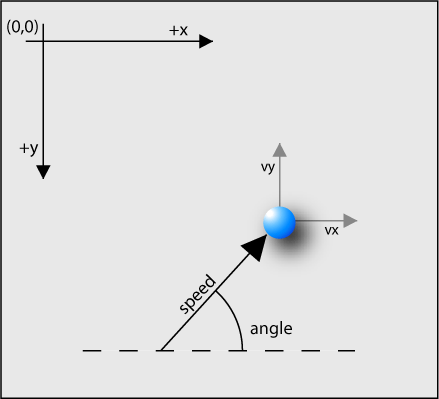
The above graphic shows the environment we are working in. HTML5 Canvas has the origin starting at the upper left corner, and I have defined the angle of the particle to start along the positive x-axis and increase counter-clockwise. This is why our y velocity was made negative in the Particle constructor, so that angles from 0 to 180 travel up towards the top of the canvas.
We will give our particle type one method, update, which is responsible for moving the particle:
Again pretty simple stuff, dt is the change in time (in seconds) since the last time we updated, and using that we move our particle. This shouldn’t come as too much of a surprise, moving a particle in a game world is just like moving anything else. We also subtract dt from our life total. If the particle’s life value hits zero, then it’s considered dead.
Since the particles have their own update method, creating the overall particle “system” in this case is easy. We just need an array that stores the newly created particles in, and each frame of the loop iterate over that array, telling each particle to update:
So far we can only influence a particle’s angle and its speed. But, by creating a whole bunch of these particles, and varying their speed and angle a little bit, we have the beginning notions of a particle system.
Not too impressive eh? But it is reminiscent of water shooting out of a hose, at least a little bit anyway. If we alter the system just a smidge, and allow particles to go off at any angle, we end up with a starburst pattern that kind of looks like a firework exploding:
With this very primitive code we’ve hit upon three key tenants of particle systems:
- They are actually pretty simple, conceptually. Just a whole bunch of particles flying around.
- Each particle has a finite life. This doesn’t mean much yet, but it will become key later on.
- Slightly randomizing each particles’s parameters creates an illusion of the whole system being organic and not too rigid or precise.
Adding More Parameters to Our Naive System
Let’s keep going. Let’s allow our particles to fade out as they age, get smaller as they age, and have slightly varying colors. Already their life property is becoming important:
By just allowing some variance in color, size and opacity, our particle system is drastically improved. It looks and feels much more organic.
Let’s Get Our Act Together: Introducing the Emitter
This is all looking pretty good so far, but there’s a serious problem with our particle system. Whenever we want to send a particle out into the world, we are creating a brand new particle object. This implementation is keeping track of all the particles in an array, and this array’s size is quickly getting out of hand; we’ll eventually run out of memory. We could periodically remove all the dead particles from the array, but that would cause the garbage collector to get triggered a lot.
Instead what we need is a pool of particles. When we want to fire a particle out, we will grab an available one from the pool. When a particle dies, it will be returned to the pool to be recycled later. Once the pool has been created we no longer need to create any new objects, nor do any need to get garbage collected. We can keep our particle system running forever and never hit any memory problems or garbage collector induced jitters.
This is the job of the emitter, who keeps hurling out new particles to meet the demands of the system. It’s also very common to let the emitter handle all aspects of the particles. Particles themselves become very simple structures with just their attributes (color, velocity, size, etc), and the emitter is the brains of the operation making sure everything is being updated correctly.
We can tell the emitter how we want the system to behave, and it will use this information when preparing a new particle. No matter if we want fire, sparks, blood or snow, we can configure the emitter to handle it all. Particle systems are truly flexible beasts.
Here is some pseudo-code of what a typical emitter looks like.
That code is super simplified, of course. The real code for the emitters used throughout this article is here. The code for emitters tends to be a bit tedious as you have to deal with so many different properties of the particles.
How the Particle Pool Works
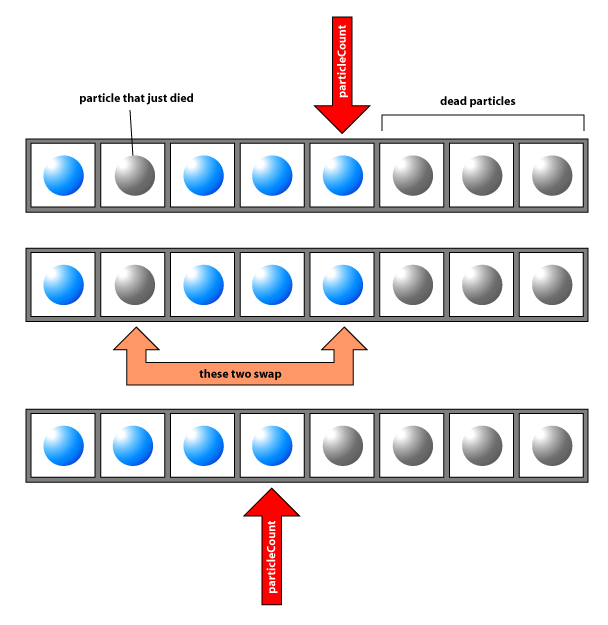
There are many ways to implement the particle pool, such as queues, and the implementation can use linked lists or arrays or whatever is appropriate for your environment. For the particle system engine used in this article, a simple array was used. The emitter has a particleCount property which indicates how far back into the array the live particles go, beyond particleCount is where the dead ones live. Whenever a particle kicks the bucket, we swap its position with the last alive particle in the array, and decrement particleCount. This has the advantage of when we are updating the particles, we just need to iterate from 0 to particleCount, which is nice and simple.
Properties Changing Over the Life of a Particle
The particle’s life property is an important one. With it we can know how far along in its life the particle is, and tween certain things about the particle based on this. A common example of this is the particle’s color. If we specify a starting color of say red, and an ending color of blue, the particle will gradually work its way from red to blue, hitting many purples along the way.

Here’s how we set that up when initializing the particle:
particle.deltaColor ends up being how much to tweak the color per frame. By the time the particle’s life is over, we will have tweaked using deltaColor to the point that the particle’s color ends up being its endColor. Here’s how we do it in the update method:
Where delta is how much time has passed since the last update. In the above code snippets we’ve hit upon two common patterns used throughout a particle system:
fooVaris how much we want a given particle’sfooproperty to vary. If it’s zero, then all particles get the same starting value, otherwise each particle gets a slightly different value, based on how largefooVaris. We just multiplyfooVarby a random number between-1and1each time we initialize a particle (that’s whatrandom11()is doing for us)- For properties that have a start and an end, we figure out how much to tweak them each frame, then apply that tweak each time we update.
Using these two patterns we can apply all kinds of interesting parameters such as the particle’s angle, its velocity, size, color, shape, even how gravity and other forces effect if if we desire. If you look at the code for the Emitter, you can see that’s pretty much all the emitter does (checkout _initParticle() and _updateParticle() in particular.
The Renderer
We’ve touched upon two of the three major pieces of a particle system, now let’s talk about the final piece, the renderer. Thankfully not much needs to be said here, rendering the particles is pretty straightforward. Here is some pseudo code to get the idea across:
As your particle system becomes more complex, so does the renderer. I’ll touch upon some rendering specific issues with HTML5 canvas later on in the article. It’s good practice to keep all rendering specific code out of the particles and emitter and isolated inside the renderer. This way you can easily swap out a canvas renderer for say a WebGL renderer, or – if you’re adventurous – a DOM renderer using divs and CSS. The code for the renderer used in the example particle systems can be found here
Emission Rate
Now that our system uses a pool of particles, two factors become important: emission rate and total particle count. Total particle count indicates how big the pool should be. Emission rate is how often a new particle is initialized and sent on its way. But you have to keep in mind that the particle system can only send out a new particle if one is available in the pool. So emission rate and total particle count go hand in hand. The most common solution for emission rate is totalParticleCount / averageLifePerParticle. So if you have 100 particles in your pool and life is set to 5, then your emission rate should be 20. This ensures a constant flow of particles from the emitter without any gaps. But of course the emission rate depends on what type of system you are making, sometimes gaps are desirable, or sometimes your emission rate is purposely set very low.
One thing to keep in mind, it is easy to have too many particles and too high of an emission rate. When this happens your particles are all overlapping and crowding each other, and it’s easy to have so many that the particles at the bottom of the pile aren’t visible at all. When this happens your particle system is unnecessarily inefficient. Be sure to play with emission rate and total particles to get the effect you want with as few particles as possible.
Textures and Additive Rendering
So far our particles have been simple, flat colored, circles. If each particle was a texture instead, the realism can be improved nicely. It’s common for the texture to be a simple “fuzz ball”, we are going to use this texture for most of our systems:
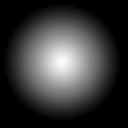
Here it is blown up to eight times its actual size, and given a black background to be more visible. The texture is fully white in the middle and gradually fades to transparent. By having that gradual fade out, whenever particles overlap each other, they can appear to “join together” and create a larger overall shape and give the system a more organic feel.
In the above system, feel free to change the texture to an image you have on hand (best to keep it small, say around 16x16). If you want to return to the default texture, hit the “reset texture” button. Be sure to try out disabling textures too, as the difference is quite dramatic.
Additive Rendering
There is something else going on in that above fire particle system, the textureAdditive property is turned on. If you turn it off, you’ll get a really different effect. This is additive rendering, and it often goes hand in hand with textures. With additive rendering, whenever a new particle is rendered on top of a previously placed particle, their color values are added together and the overall effect is that part of the canvas heads towards white. This really enhances the fire’s realism. Often when you go with a fuzzy texture like this, you will also want additive rendering.
In the world of 2D HTML5 canvas, this effect is accomplished with globalCompositeOperation set to lighter.
“Tinting” the Texture
Notice how the texture itself is white, but the end result is an orange fire? Typically you want to “tint” the texture to allow your system to take on any color you want. In order to do this in HTML5 Canvas, you will need to use the source-atop global composite operation. You need to render the texture into a second canvas, then render your chosen color on top of it using source-atop, then take that result and render it into the main canvas. Depending on your browser of choice, this can be pretty expensive.
For more information on globalCompositeOperation, Glenn Barnett’s article here at Build New Games is a great read. His section on source-atop is exactly the technique I used to tint the textures.
A Note on Performance
Now that we’ve introduced textures, it’s a good time to take a look at performance. The above “tinting” procedure can be pretty expensive, depending on which browser you are using (and possibly, even on what graphics card your machine has). Different browsers perform differently on various particle systems, depending on what that system is demanding. For example I have found that globalCompositeOperation is a bit expensive in Chrome and Internet Explorer 10, but faster in Firefox on my laptop. But on the other hand, Chrome and IE10 seem to handle large numbers of particles better than Firefox does. Here are some performance numbers I get on my laptop for two very different particle systems. Fire is very texture heavy but has a low number of particles, and fireworks doesn’t use textures but has a lot of particles:
| fire | fireworks | |
|---|---|---|
| Chrome | 30fps | 60fps |
| Firefox | 45fps | 30fps |
| Internet Explorer 10 | 30fps | 60fps |
Keep in mind these numbers are not accurate benchmarks, just rough numbers I pulled from one machine to show how different browsers can perform.
This is important to keep in mind when adding particle systems to your game. Be sure to test in a lot of different browsers and machines!
Adding Physics to Our System
So far our system has ignored the laws of physics. By adding some simple, common forces, we can give our system another boost in realism. Here we’ll talk about gravity, radial acceleration and tangential velocity and tangential acceleration.
Gravity
Let’s start with gravity as it’s the simplest of the three. Just like the force of gravity keeps us firmly attached to the earth, we will have gravity pull on our particles and eventually bring them back down. Gravity is optional, and only makes sense if what you’re trying to create calls for it. If we were creating fire (like above), we’d want gravity to be turned off, but we’d want it on for say a water geyser or blood splatter.
Unlike the gravity of earth, we can have our particle gravity be in any direction and of any magnitude. So gravity can be used to simulate wind and many other forces.
Radial and Tangential Acceleration
What if we want our particles to move in a circular fashion? That’s when these two intimidating sounding forces come into play. They’re really not so bad. Radial acceleration is a force that acts on an object that is moving in a circular fashion. Think of a satellite orbiting the earth. The earth’s gravity acts as the satellites radial acceleration, it wants to pull the satellite in. The satellite also has tangential velocity, which is what causes the satellite to move forward. When you combine the two together, the overall effect is a circular path of motion:
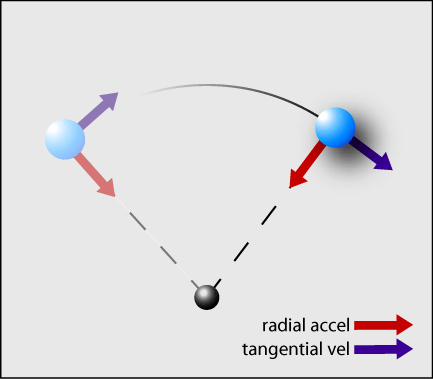
In the case of a satellite, the tangential velocity is constant, and balanced against the radial acceleration. This means the satellite continually moves in a circle. If the satellite had more tangential velocity, its path would spiral outwards until it eventually escaped the pull of earth’s gravity. If it had less tangential velocity, the radial acceleration would win over and the satellite would spin its way down and eventually crash into earth.
Ah but you originally said tangential acceleration, how is that different from tangential velocity? Just like acceleration causes an object to change in velocity over time, tangential acceleration causes an object’s tangential velocity to change over time. Tangential acceleration is usually what we really care about in a particle system. For this particle system (as well as most others), tangential acceleration is used to cause the particle to continually spin out more and more.
You might notice a slight disconnect here. Radial and tangential acceleration are vectors, but for the particle system we only specify a scalar value. What’s the deal? We only need the magnitude of these two accelerations, because we can easily figure out their direction. For radial acceleration, the direction of the vector is from the location of the emitter to the particle. And for tangential acceleration, the vector is just perpendicular to the radial vector. For the radial acceleration vector, this is opposite of the above diagram and opposite of what physicists typically use. Normally the radial acceleration vector points from the object back to the center. The reason for it being opposite is precedence, Cocos2D (and LOVE2D for that matter) did it this way. So if you want your particles to spin back towards the center, you will need a negative radial acceleration value. I would have preferred it to be the other way around, but overall I felt staying consistent with other implementations was more important.
The Possibilities Are Endless
We’ve covered a lot of ground on particle systems, but there’s still so much more that can be done. Industrial strength engines like Valve’s Source or Unity3D have particle systems that can do some truly jaw dropping things. Common additions to particle systems are enabling the particles to spin, participate in hit detection, or even participate in a full fledged physics engine like Box2D.
It’s also common for the emitter to have a physical shape, instead of just a singular point location. Particles can spawn at any point along the emitter’s surface, thus the shape of the emitter influences how the particles as a whole behave. The particle systems used in this article (and those in Cocos2D) simulate this to an extent using the posVar attribute.
I Fell Into a Burning Ring of Fire …
As one final hurrah, let’s add one more feature to the particle system. We’re going to add a transform function, which will allow us to give each particle more interesting and varied starting positions. If the emitter has a posTransformFn property defined, it will call this function every time it’s about to initialize the position of a particle. It passes to this function the posVar for the particle. If we tell the engine that posVar should be { x: 180, y: 0 }, then the x value for each particle’s posVar will land somewhere from -180 to 180. We can use that value and plug it into the function for a circle, and create a nice “ring of fire” effect:
where 80 is the radius of the circle in pixels.
And Finally, an Online Particle Designer
The particle engine, and its designer, that I created for this article is up and running here. By default it gives you all the possible input parameters for a system, allowing you to customize your particle system in any way you like. The code for this is all up at github. See if you can make a particle system to simulate flowing lava or noxious gas. If you come up with any cool particle systems, I’d love to hear about them in the comments below or hit me up on Twitter.

Comments