Setting the right atmosphere and mood is important in any type of game. From Myst-like puzzles to real time strategy to first person shooters, lighting plays a huge role in how players interact with a game’s world are impacted by it. Mysterious and horror games meant to keep players on the edge of their seats usually have darker environments, punctuated by brighter areas and objects to ensure you notice them. Other genres tend to use more balanced lighting systems, and games that are praised for their appearance masterfully paint their worlds onto our screens, the environments telling stories of their own. Lighting is a topic which merits an in-depth study all on its own; most artists spend years mastering the subtleties of light and color. This article will introduce you to the key concepts of light in computer graphics and how to use it effectively.
Many different considerations go into lighting of any kind, be it for games, movies, or even in well-architected buildings. Every AAA game I have read the credits for has had at least one lighting director; these people make sure every inch of graphics look their best and contribute to the story. Think about this for a moment - there are people whose primary job is studying how things look and tweaking environments to get the best possible result.
Big games have lighting directors is because light is a complicated topic, both in the real world and in computer graphics. In reality, light travels from its source and is reflected, scattered, and/or refracted for every surface it encounters. Realistic modeling of light in simulations is called ray tracing and can generate very lifelike images by casting rays into the scene to calculate physically-correct lighting. Ray tracing’s downside is that it cannot run in real time on today’s hardware. In fact, a single ray traced frame can take hours to render, although some implementations for games can achieve frame rates up to 20FPS (Intel’s Quake Wars: Ray Traced and nVidia’s OptiX).
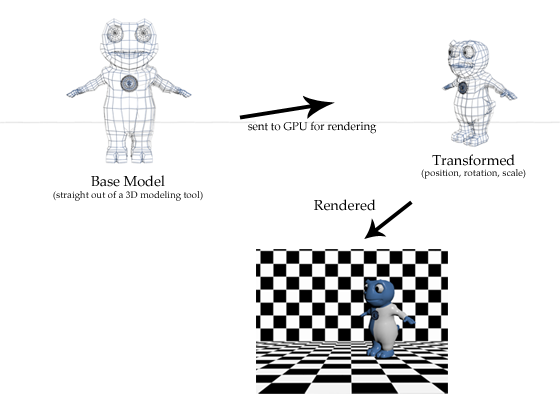
Instead of sending millions of rays into a scene, most games use a method where each object is individually sent to the GPU where it is mapped into 3D space and rendered. Creating refractions or reflections can be difficult when using this method because models do not have information about any of the objects around them. Games have been using this technique for decades and graphics cards provide dedicated pipelines for drawing objects this way.
Lambert
There are a few standard ways to calculate how light illuminates a surface, and while there are numerous variations within each method, we’ll look at the most common configurations. The first of these is a very simple model known as Lambert lighting, named after Johann Lambert who described the idea behind it in 1760. Objects lit in this way are called Lambertian and emit light evenly across all viewing angles. This means that different points on an object will look the same no matter what angle they are viewed from. Thus, the Lambert model is used to render objects which have only diffuse lighting, where there is no glossiness or reflections.
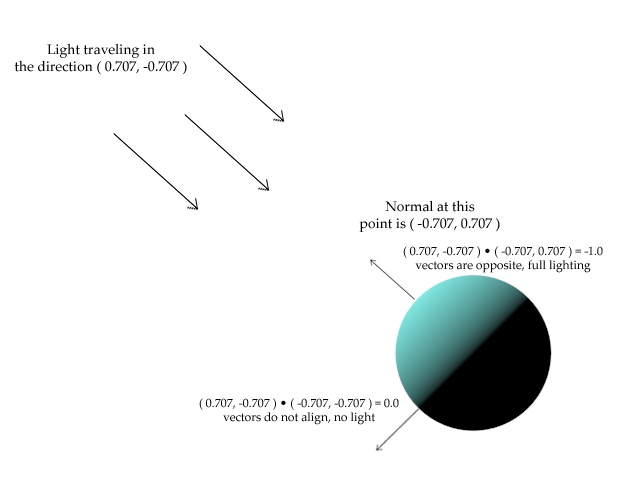
To be able to calculate the lighting at a point on an object we need to know a few things about the light and the object. First we need to know the position of point on the object relative to the light source, which is found by light_position - point_position. Second, we need to know the normal vector of the object where we are performing the calculation, which tells which direction the surface is facing. Once we have this information Lambert lighting is very easy and intuitive to calculate. Simply put, surfaces directly facing the light are fully lit and the amount of lighting falls off linearly as the normals turn perpendicular to the light. To determine if two vectors, such as the surface normal and the light direction, are in the same direction we need to find the angle between them. This is very simple to calculate and the result is called the dot product of the two vectors. First we normalize both vectors so each one has a unit length of one, then the dot product can be calculated as Ax*Bx + Ay*By + Az*Bz. The dot product of any two normalized vectors will be a value between -1.0 and 1.0, where 1.0 means the vectors are pointing in the same direction, 0.0 indicates they are perpendicular, and when the dot product is `-1.0’ the vectors are pointing in opposite directions. This result fits perfectly when calculating Lambert light where we want to know the relation between the light direction and the surface’s normal vector.
Phong
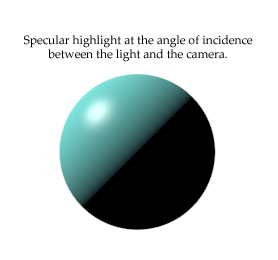
Another common lighting model is called Phong illumination, named after Bui Tuong Phong who first published the method in 1973. Phong lighting is used for surfaces that have specular highlights, which are the direct reflection of the light off of the object. These reflections can range from dull, such as plastics or a polished wood, to sharp and bright as on the body of a car. This type of lighting is made up of two components: diffuse light like we get with Lambertian surfaces and also the light’s reflection. To find this second part we must determine what angle we are viewing a point on the object’s surface and compare it to the angle at which the light is hitting the same point. Since light reflects off of shiny surfaces at the same angle it strikes the surface (called the “angle of incidence”), we immediately know the angle of the light from the object towards the camera.
To further customize the look of an object, Phong materials have two constants: specular coefficient and shininess. The specular coefficient is the ratio of reflection of the incoming light and determines how much of the light gets reflected, and therefore the highlight brightness. Shininess is used to specify how large the highlights are, with larger values indicating a smoother surface with smaller highlights. With this information, Phong lighting can be calculated as:
specular * ( reflection dot view )^shininess
Where reflection is the vector of the light reflecting off of the object (angle of incidence) and view is the vector from the camera to the point on the object’s surface.
Other Methods
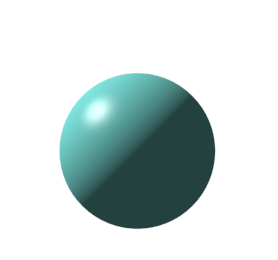
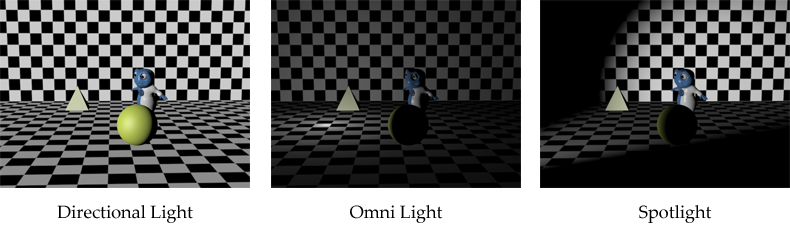
There is an almost endless supply of ways to compute how a light illuminates a surface. The two methods above have many different implementations, each finding an unique balance between efficiency and realism. Some lighting models are better for smooth surfaces while others are better at representing rough objects like cement and brick. In addition to these different ways of calculating how a surface is lit, there are many different kinds of light sources. Overall there are four types of lights which are used in 3D graphics: ambient, directional, omni, spotlight. Ambient light is different from the other three because it doesn’t have a real source. Instead, ambient lighting is applied equally to every part of a scene regardless of position or orientation. In the renderings of the sphere above the side facing away from the light is completely black. This is almost always undesired, as even in the darkest shadows there is usually some detail to be seen. If we add some ambient light to the sphere we get a more natural looking rendering.
Directional lights are commonly used to simulate sunlight, with all of the rays traveling the same direction. Omni lights cast their rays evenly in every direction and are often used for wall and ceiling lights. Lastly, a spotlight limits the direction and angle in which it will illuminate objects.
Using Lights
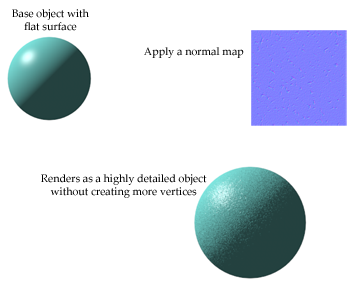
With a basic understanding of how to calculate lighting it is time to look at how light affects our perception of the world. Light lets us see details in objects so we can determine how they are shaped. Smooth surfaces have soft gradients between light and shadow and objects with sharp edges show distinct changes in their appearance. If you try to model all of the edges in a highly-detailed surface you will end up with thousands of vertices, taking up memory and slowing down the rendering process. The most common solution for rending high-quality objects with a reduced number of vertices is called bump mapping. This works by processing an extra texture while rendering, called a normal map. Because an object’s shading is based on the surface normals, this texture adds additional information which is used to calculate more detailed normals. These maps usually have purple or bluish tinge and represent relative changes to the surface.
Simulating Sunlight
If you are creating an outdoor world, sunlight could be one of the most important lights for setting the right mood. In most scenes it is added as a directional light so all objects are lit from the same angle. As we saw above this is the easiest light to calculate and the most efficient. While this simple one-direction, one-color light may enough for some scenes, realistic sunlight is much more difficult to model. The path light takes from the sun to our eyes is nothing close to a straight line. When traveling through Earth’s atmosphere it is bounced around and refracted in a process called atmospheric scattering. It is this refraction which causes the sunlight’s color to change throughout the day, and is responsible for most of the ambient lighting found outside. One of the simplest ways to simulate this indirect sunlight is to include bluish ambient light to mimic the indirect lighting from the atmosphere. More advanced models actually calculate how much refraction would occur as the light travels through the atmosphere and uses that to choose the sunlight’s correct color.
You have probably noticed that as a cloud passes in front of the sun, not only do things become less bright but they lose contrast as well. This is because clouds act as giant diffusers, scattering the sunlight across their large surfaces and effectively converting the direct sunlight into ambient lighting. When adjusting the lighting in any scene it is important to keep this relationship between direct and indirect in mind. As direct lighting increases, color will become more saturated, textures appear richer and deeper, and shadows have more of an impact. Again, the balance you use must depend on the mood you are trying to create, and also lots of trial and error.
Environment
When it comes to designing the feel of a game lighting is one of the most important components. One of the best ways to learn how small changes in light affect our environment is to set up a camera and take pictures at two-minute intervals during sunset. This is a practice often taught in photography classes and demonstrates how dramatically scenes change when their lighting changes slightly. If you really want to master the art then take some photography or art classes; these disciplines rely heavily on understanding how light interacts with objects and how to control those interactions.
Just knowing the overall feel you want a game to have is not enough. Horror games are dark, which means lots of shadows for enemies to lurk in and jump out from. However, it is usually light - not darkness - which defines a visually compelling horror game. Simply using lights and shadows to create darker areas is not enough, instead it is about how these two pieces interact with each other and create a story of their own. Great lighting can often be the difference between an “okay” game and one people talk about for a long time.
Unfortunately there is no magic formula for finding the perfect combination of light, shadow, and color. In fact there is no formula to find a good combination of these. Our perceptions are subjective and everyone will interpret the same scene in different ways. Remember, there are people whose jobs are dedicated to getting this balance right; just as balancing game mechanics or unit strengths takes a lot of patience and testing, so does achieving the right visual balance.
Storyboards are often used to plan and lay out how a game will progress but they can also be very useful for finding good lighting. As the planning begins to fill out ideas a general mood begins to emerge. Sometimes this mood is what you initially had in mind, other times it starts to take a very different direction. It is important to pay attention to the mood as it emerges from the story and not try to force something which isn’t there. As more items and ideas are added to the storyboard their environments begin to take shape as well. In this way the lighting naturally flows out of the story, instead of being forced upon it.
Final Thoughts
There are many technical aspects to lighting and a lot of artistic areas. Thankfully there is no need to master every part in order to create great lighting - just a good understanding of how objects are lit using models like Lambert and Phong along with a bit of creativity, patience. Start collecting images which inspire you with their light and use them as references for your own work. Above everything else, practice makes perfect. Grab your camera and go take pictures, especially at different angles and lighting conditions. Write some code to simulate different lights and mess around with the settings to find what you do and don’t like. Or play some games (best homework ever, right?) and pay close attention to the details in the environment and how things are lit. Watch the world around you and be inspired.

Comments