Today we’re going to look at an alternative to the CANVAS tag which works great for HTML5 games. The best part? It is easy to implement, and works everywhere!
Though canvas is what people think of first when considering ways to render game sprites using HTML5, it is notoriously slow on older mobile devices, obsolete browsers, and many game consoles. On some legacy hardware and software, there’s NO support for canvas at all!
Luckily, there’s an alternative - one that occasionally outperforms canvas and “just works” on more devices. It is also generally hardware accelerated on modern setups, which means you’ll get great performance. It even runs well on mobile devices - sometimes faster than canvas by a long shot. What is this secret new technique, you ask? DOM sprites!
For skeptics, before you read on, try out this demo. You may be surprised at the performance!
This article explores the whys and hows of using the decidedly less sexy, lower tech, but more compatible DIV elements for sprite rendering instead of pushing pixels using a canvas tag. It’s a great alternative, and one that you may not have considered.
What exactly are DOM sprites?
The DOM (document object model) is the basic model by which web pages can be manipulated. HTML files are typically made up of DIVs and SPANs and many other elements. Each element contains text or images, and are positioned, sized and styled according to CSS stylesheet rules and can be animated with javascript.
These DOM elements don’t necessarily have to contain walls of text. Take, for example, the humble and ubiquitous DIV tag. If you were to leave it empty and use CSS to give it a size, position and background image, you could use it to display an in-game sprite, such as a mushroom, bullet, or explosion.
Taken to the extreme, you could make an entire HTML5 game using nothing more than divs, each styled and animated using javascript and css!
Why would anyone want to do this?
There are several reasons. In particular, consider the vast amount of engineering R&D that has gone into making regular HTML div elements render as fast as possible. The rendering of DIVs has undergone massive optimizations each year for well over a decade, and by now textual elements like DIVs render super fast: silky smooth on virtually all browsers, old and new.
In today’s web browsers, DIVs are typically rendered using hardware acceleration. Just like a WebGL, Unity, or Stage3D polygonal mesh that uses a texture, the image data is sent to your GPU and gets drawn in hardware extremely efficiently.
Instead of creating shaders and assigning UV coordinates to simple meshes, you can (perhaps surprisingly) achieve nearly the same hyper-efficient performance using simple DOM sprites.
Mobile first!
Even more compelling is the consideration of mobile performance. Underpowered CPUs with limited blitting performance due to slow ram access means that drawing pixels on screen using the canvas html5 tag is often shockingly slow.
This is especially true on older devices where canvas rendering is not done on the GPU and all blitting is performed by the comparatively slow CPU.
By comparison, the buttery-smooth text rendering of a typical web page is well optimized even on older devices. For example, anecdotally, on Android 2.3 and the iPad 1, DOM sprites outperform CANVAS.
Why? Think about it more deeply: a text-heavy web page might contain a hundred thousand characters (letters), each part of DIVs and SPANs and TABLEs and FORMs that may number in the hundreds. Imagine if each of these glyphs was, instead of a piece of text, a game sprite. It can be done, and it can be done easily.
The most common way of creating a DOM sprite is to create DIVs for each sprite, each styled with a background image that uses a small portion of a larger spritesheet (just as an optimized game would using other techniques like Flash 11 Stage3d or WebGL).
A caveat:
We’re not saying that using DOM sprites is “better” than using the canvas tag. This is merely an alternative method for drawing your game’s visuals that is worthy of consideration. It isn’t for everybody, and naturally it also has some drawbacks.
In particular, DOM sprites can’t be changed on a pixel-by-pixel basis. There are no shaders or blend modes (yet). They aren’t as “sexy” as canvas tags. Heck, some people think HTML5 equals CANVAS and nothing else.
Remember, no one technique is a panacea: nothing works for every possible situation. Instead of immediately rejecting DOM sprites as uncool, or conversely embracing them as the new ultimate elite technique of gamedev domination, remember than this is just one technique among many.
On brand new hardware with the latest browser versions, CANVAS will likely outperform DOM sprites. On older hardware or software, DOM sprites will often outperform CANVAS. The choice is yours.
By using DOM sprites instead of CANVAS (or WebGL) you gain the advantages of universal browser support and that delicious “works anywhere” feeling. That, in itself, can be reason enough.
Time for an example!
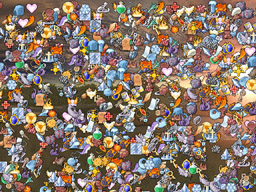
We’re going to use a spritesheet for all the demos on this page. By stuffing tons of sprites into a single large image instead of forcing the browser to download tons of tiny image files, we save page load time, since our entire game’s artwork can be downloaded in a single server request.
Here’s the spritesheet, part of a set of great public domain fantasy icons that were made by a talented artist named Ails.
![]()
Here’s an example DOM sprite that uses it, with the inline CSS for simplicity:
And here’s what it looks like:
As you can see, we’re “chopping” up the spritesheet by only displaying a portion of it. To animate sprites, or simply select a different “frame” from the spritesheet image above, all we need to do is offset the background image.
Now our sprite is using a different frame - one that starts 96 pixels to the right and 64 pixels down.
For any one sprite in our game, we’re only going to be using a small portion of the spritesheet. Using this simple technique, we have all sorts of nice looking, efficient, partially transparent game sprites.
Looks simple enough. So what can I do with this?
The next steps almost write themselves - undoubtedly you already see exactly where we’re going. We can animate the position, size, rotation, opacity, and frame (using the background-position) of the sprite. We can indeed animate it just as we would in big expensive game engines.
With a simple timer, or though mouse events, we can animate our DOM sprite by shifting the DIV’s background image around.
Click this image a bunch of times to see it switch frames. Woo hoo! I can fly!
Of course, you could take this much further. Instead of using mouse events, you could set up a timer in javascript to animate your sprites using any number of frames. Additionally, there’s no need to use inline styles. In a real HTML5 game, you would want all styles to be in a .css stylesheet, with many sprites all sharing a single css class and spritesheet.
What about performance?
The great news is that this technique renders fast. The browser knows to blast all those 32x32 pixels to screen at once - in most instances the entire 1024 pixels are drawn in a single pass.
Taken further, you can create huge groups of sprites - your level geometry for example - and put them into a container div. Guess what? The browser will draw all million pixels in a single pass. If left unchanged, the entire level is often cached as a single texture on your video card for ultra-efficient re-use on subsequent frames.
By grouping sprites into container parent DIVs, we can move around an entire game level (made up of hundreds of sprite tiles) by moving a single DIV, instead of changing the locations of each tile individually.
Sounds too good to be true. PROVE IT!
Here is a simple DOM sprite bechmark demo that will hopefully give you confidence in this unusual technique. Once per second it adds several new sprites to the scene until the framerate dips below 30fps. Most modern gaming rigs can handle well over 1000 sprites, and mobile devices (even older ones) can handle at least a hundred.
Let it run for a while - until the FPS stays around 30. How many sprites can it render on YOUR machine?
Surprisingly fast, wouldn’t you agree? Definitely enough for any typical game. Please note that this is not an accurate benchmark: not only is there room for further optimization, but some of the level tiles are off-screen at any given point in time. That said, with a little imagination it is easy to picture using this ultra simple DOM sprite demo as the basis for an Angry Birds, Space Shoot-em-up, Puzzle Game, or Super Mario Brothers style platformer.
Try out the demo on a few of the devices you own. As you can see, using DOM sprites gives respectable cross-platform performance. It works on almost all browsers and hardware: from the very new, like Windows 8, to the less powerful, such as five year old browsers, game consoles like the PS3, XBOX360 and Wii, smart TVs, phones, tablets, and more.
It works great in Phonegap/Cordova or Appcelerator Titanium projects, or for standalone .exes using things like Awesomium or Windows 8 WinRT HTML5 apps. Heck, HTML5 webview wrappers are available for almost every device, from new Blackberries to Mac OSX and Linux. You can count on DOM sprites to work pretty much everywhere - even places that canvas does not.
I’m convinced. Show me how this is done!
The following tutorial will produce the full source code for the demo above. Note that it is merely a single html file and two images. Simplicity itself. No external scripts. No wierd dependencies. No huge game engines.
Let’s begin, shall we! First up, the styles.
So far, so good. To begin, we create an HTML5 web page using standard boilerplate markup. We then define the CSS styles we’re going to need for our sprite demo. In particular, note that we give all divs a position:absolute for simplicity.
After styling the page, stats, header and button, we define the styles for our “game” window (#viewport) as well as the size of our “game” world (#level).
The #viewport div holds the entire demo, and inside it we will animate hundreds of moving sprites.
The #level div will contain non-animated sprites that in a real game would be the platforms that Mario jumps on, for example.
The #background div will be used for a parallex scrolling tiled image. In this demo, it contains the “sunset” horizon. We’ll scroll it at half the speed of the level to make it seem farther away.
Finally, we define the size of the .sprite class (32x32 pixels), which will be used for each of the hundreds of sprites we will be creating. The spritesheet image used for our sprites (the fantasy sprites seen above) is going to be used for all of our sprites. Which frame gets drawn is controlled by scrolling the DIV’s background inside each sprite.
The HTML above should be self-explanatory. It simply creates the HTML elements we’re going to need. The viewport contains everything: all the moving sprites as well as the non-animated “level” tiles and parallax background. As you can see this html page itself is tiny: we’ll be adding hundreds or thousands of sprites using javascript below.
As with the CSS, you might choose to break up this single html file into three smaller files (.html, .css and .js) but for example purposes one file to rule them all makes things easy. Continuing with our web page, add the javascript we need, as follows.
In the code above, we create a number of variables for use in our demo. In a larger game project, we would probably want to avoid polluting the global namespace by creating a closure or single-instance game engine class. We first grab references to the five html elements we’re going to want to interact with. Yes, we could be using jQuery $ functions instead, but there’s something nicer about a dependency-free version for learning purposes.
We then measure the size of the viewport and level DIVs, and define a levelSpeed (the speed at which our background will scroll), plus the current location in the level for use in animating it. Next, we’re going to keep track of all our sprites and the game state.
We’re going to collect all the sprites (both moving and static “level geometry tiles”) in two arrays. We also need to keep track of time in order to measure the framerate in frames-per-second (FPS). Depending on how fast we’re able to render our game world, we will add or remove bunches of sprites once a second in an attempt to maintain a steady framerate as defined by targetFramerate.
Since we’re using a single large spritesheet that contains all the images we need for our game’s sprites, we define a few constants above that will help us “chop it up”. If you change the size of the spritesheet.png image, you’ll need to change these values.
Now that we’ve defined all the variables and constants we need, let’s start animating!
To ensure the fastest framerate, we’re going to use requestAnimationFrame instead of an old-school setTimeout event. This function is optimized to run as often as possible, but only if the page is currently visible. This helps to lower CPU use when multiple browser tabs are open, which saves battery power on mobile devices.
Just in case we’re running on an old browser, we are including the standard polyfill which checks for vender prefixed version of the function or simply uses the old fashioned setTimeout function if all else fails.
The first demo-specific function we want to create is the one that fills up our game world with stuff.
The maybeMoreSprites function above is the real meat of our demo. If the framerate is above targetFramerate (which is currently set to 30), then several new sprites will be added to the scene. If performance slows to unacceptable levels, sprites are removed.
This way, the demo will run at around 30fps no matter what hardware we’re using.
In order to know what the FPS is, we need to measure elapsed time each frame, as follows.
The function above grabs the current timestamp each and every frame and measures how many milliseconds have passed since the previous frame. Once per second, we update the stats text and optionally add or remove sprites as required.
Now that we’re filling up the world with stuff, we should code a way to move things around.
The function above uses standard CSS styles (or, optionally, CSS3 transforms) to change the position of an animated sprite to match the x and y value of the object (the “this”) that calls this function.
In addition to movement, we want a function that allows sprites to change what frame they are displaying from the spritesheet.
This function simply shifts the background image (the spritesheet) to whatever sprite number is specified by the object that calls it.
This function is used to remove a sprite from the game world. In a production environment, the best practise would be to mark it as inactive and put it into a “pool” for reuse in the game, rather than destroying anything. This way, there are no GC (garbage collection) hiccups.
Take bullets, as a perfect example. Instead of adding new sprites to the scene and then removing them when they hit something, it is far more efficient to make inactive bullets invisible and when a new one is required “recycle” an old one. This optimization is left as an excercise to the reader.
Now that we’ve created functions that allow an object to change frames, move around, and be removed from the simulation, let’s create the sprite class that will use them.
The simple sprite class, as defined here, holds a reference to one DOM sprite (a div, which is either added to the viewport, in the case of animated sprites, or to the background, in the case of level tiles).
The speed and position x and y are given random values, and a random sprite from our spritesheet is chosen. Once created, we add our new DOM sprite to the proper container element and we’re ready to go.
We’ve now coded everything needed for sprites in our game. All we have left to do is animate our demo.
In the animation function above, we iterate through all known animated sprites and move them according to their current speed. If we are about to go off-screen, we bounce off the viewport edges and start moving at the appropriately mirrored velocity.
We also scroll the background (sunset sky) image, and move the non-animated level sprites. As mentioned above, instead of moving each one individually, we’ve put them inside a container DIV (#level) and therefore can simply move that one element to scroll potentially thousands of sprites in one go.
There’s only one last thing to do: create what is called “the render loop” which is a function that gets called every frame.
Our animate function simply asks the browser to call itself again and again as fast as possible, then measure the passage of time and animate the scene accordingly.
Finally, we can code the onClick function for the button that you press to start the fun.
That’s it! You can save yourself the trouble of copy-n-pasting all that code from each individual section of this tutorial by downloading the entire source here.
I hope you enjoyed this tutorial. As you can see, using DOM sprites is a viable alternative to CANVAS rendering. It has the advantages of hardware acceleration, simplicity of use (with jQuery, for example), and it works just about everywhere.
As a means to render videogame graphics, DOM sprites can boast the widest possible cross-browser and cross-platform compatibility. It will work in many places that CANVAS does not. DOM sprites aren’t perfect for every game project, and come with many limitations, but they work on low-end devices and older browsers. Hopefully you will consider them part of your HTML5 gamedev bag of tricks.
Good luck with your future game projects, and remember: Keep it simple, have fun, and don’t give up: YOU CAN DO IT!
Kind regards,
Christer Kaitila
aka McFunkypants
P.S. I love to connect with my fellow gamedevs, so please feel warmly welcomed to follow me on:
my blog: http://www.mcfunkypants.com
google+: http://google.com/+ChristerKaitila
twitter: http://twitter.com/McFunkypants

Comments