Introduction
When building an HTML5-based game from start to finish, it is helpful to have a consistent structure for your code and common design patterns to follow when organizing your code. A good game engine helps with this and also save you a lot of time by providing already-written, tested, and proven code to meet common needs such as basic control schemes. As your game grows in size and complexity you’ll be doubly glad that you built it up using common structural patterns. Plus, by using an engine that dozens or hundreds of other developers are using you can tap into an engaged and supportive community to help you along your way.
Crafty, previously known as CraftyJS, is a small, simple, and lightweight game engine that can greatly help you build prototypal or fully-featured 2D HTML5 games. Crafty is also open-source and completely free. Its code is hosted openly on GitHub.com and is distributed under the MIT or GPL license.
In this tutorial, I’ll show you how Crafty makes it easy to make simple, 2D games and I’ll walk you through the process of making a very simple game from start to finish. By the end of the tutorial, you’ll know how to start making your own games from scratch using Crafty and you’ll have our example game built and running in your own development environment which will give you a great jumping-off point for future projects.
What is Crafty?
![]()
Crafty is a cohesive collection of custom-built Javascript libraries that provide a framework for building browser-based games using standard web technology. In other words, it’s a Javascript-based HTML5 game engine. It’s designed to make it very easy to make simple games with 2D graphics. Think of Crafty’s utilities as the glue that binds the pieces of your game together.
Why Crafty?
Crafty strikes a fine balance between doing too much and too little for you. It will help you get your games running in very short time but will get out of your way as you dive into the nitty-gritty parts of the engine and customize behavior. Crafty is also very lightweight in terms of file size, weighing in at around 100kb. That means it’s small enough that it won’t significantly delay your game’s startup time.
You might ask why you need an engine at all. Strictly speaking, you don’t; you could build an entire game from scratch and this can sometimes be a good idea for especially unconventional games. However, for most games having an engine is invaluable in reducing the development time and making the game more maintainable over time. Using Crafty, you can build a simple game in a matter of day and weeks, sometimes even a mere few hours.
The makeup of a Crafty game
Before we start building a game, I’d like to explain at a high level how the major pieces fit together in a typical Crafty game. I won’t go through every feature of Crafty here. Instead, I’ll focus on the most important ones that make up the core building blocks of a typical Crafty game.
Components & entities
The two most important structural elements of a Crafty game are components and entities. An entity is any object that exists in your game world and has behavior of any kind within it, even if that behavior is just that it takes up visual space. Everything you see on the screen in a Crafty game that is not a background image is probably an entity. A component specifies a set of data and/or behaviors that can be applied to one or more entities. Components can also require that the entities they’re applied to also apply other components. This means that a component can represent compound behavior that itself uses in part the behavior given by other components.
Components can be used to describe all kinds of behaviors. As I’ll show you later, many of Crafty’s build-in utilities are accessed via components.
Publish/subscribe event system
Another of Crafty’s most important utilities is it’s publish/subscribe event system. Crafty allows you to “subscribe” any number of callback functions to a given event. Those functions are then called whenever that event is fired by some other code. The beauty of this code is that the subscribers to events and the the areas of code that trigger the events do not have to explicitly know anything about each other or each other’s existence.
Scenes
Scenes are how you setup transitions from one distinct part of your Crafty game to another. For example, once we have a loading screen, game over screen, victory screen, and main gameplay screen in our game, each of these will be defined by a Scene object through Crafty.
Let’s make a game, piece by piece
A NOTE ON VERSIONS: To follow this tutorial you must use Crafty version 0.5.3. At the end of the tutorial, I’ll show you how to update the code to work with version 0.6.1, but you must use version 0.5.3 while following along with the tutorial.
Now that I’ve shown you the main elements of a Crafty game to give you a high-level view of how the pieces all fit together, let’s apply that knowledge and have some fun building a game with Crafty. We’ll build a minimally-featured adventure-style game where the goal is to run around and visit all the villages in a forest.
We’ll build the game up slowly, piece by piece, learning more about Crafty’s many helpful utilities as we go along. In each section, I’ll first describe what we are adding to the game and why we’re adding it. Then I’ll walk you through the steps required to make those improvements. Finally, I’ll provide the exact code changes for those improvements. By the end of the tutorial, you’ll have a fully-functional game and will know how to handle many common game mechanics such as collision detection, sound effects, and movement controls.
References, resources, and additional help
As we go through the steps of building our game, whenever you wish you dive deeper or learn more about how a given part of Crafty works, I encourage you to take a look through Crafty’s official API documention. If you’re really stuck or have a more open-ended question about Crafty, check out the official community forum.
Hello, Crafty
To start, we’ll create one of the simplest “games” one can make in Crafty. In fact, it’s so simple that at this point the “game” won’t even be interactive. The purpose is to show you how little code it takes to have a nominal Crafty program up and running and to help you get your working environment setup so that the next steps are easier for you to follow.
First, let’s set up a simple file directory structure to help us separate the logically distinct parts of our program. Inside our root directory, we’ll start with:
- index.html - This is the HTML file that the browser renders in order to play our game
- assets/ - a directory where all the media files and other binary data for our game will live
- lib/ - a directory where we’ll put the third-party JS files (typically called libraries, hence the abbreviated, standard name, “lib”) that we’ll use to create our game
- src/ - a directory where we’ll put our custom code (called “source” code for historical reasons, hence the abbreviated, standard name “src”)
Once your directories are in place, download the Crafty library file and put it in lib directory. For this tutorial, we’ll use Crafty version 0.5.3, which you can grab here: http://craftyjs.com/release/0.5.3/crafty.js
Next, download all the image and audio assets you’ll need as we build our game from this archive here and open the archive on your computer. Once you’ve downloaded those assets and opened the archive, move all the files in the “crafty_bng_tut_assets” directory in the archive into your assets/ directory that you just created. All the assets in the archive are free to use. See here for attribution and licensing details
Here are our two starting files, index.html and src/game.js:
The HTML file, index.html, that gets our game going in the browser, is very simple. It simply imports the Crafty game library file, crafty.js, followed by our custom code file, game.js, in which we’ll put the code to set up our unique Crafty game. Finally, a single line of Javascript tells the browser to run the Game.start function once the page is fully loaded.
The src/game.js file itself simply defines a globally-accessible Game object with a single function, start, that initializes and starts our Crafty “game”. For now, we simply draw a plain green background so that we have obvious visual proof that our code is working.
Open the index.html file in a browser and you should see:

Starting with basic terrain
So far, we have a green box that proves we have successfully loaded Crafty and told the browser to run our game code when the page loads. Now let’s use Crafty to draw something more tangible to the screen. We’ll start by drawing a simple forest scene to the screen.
While the visual outcome of this step will be very humble, it allows us to get our hands dirty with one of Crafty’s most important concepts: its component/entity model. As I described in the introduction to this tutorial, a Crafty component is an abstract description of a set of properties and/or behaviors that can be applied to one or more Crafty entities.
Crafty itself comes with dozens of baked-in components that are automatically made available to you by the engine. These built-in components make many simple game elements easy to implement, at least as a simple first pass. This means that we can start building some basic terrain pieces by constructing entities that use some baked-in components.
To keep things simple to start, let’s create some terrain by placing a tree at every edge square on our grid and then randomly placing bushes on squares in between the edges. Before we do this, it will help us to have a consistent concept of a grid on which we place our entities as we develop our game. With that grid in place, we can iterate through all the tiles in our grid and place entities in those tiles as we go along. Here is our new game.js file. Read through the code and follow along with the comments to see how the code defines and utilizes our new grid:
“Crafty.e(‘2D, Canvas, Color’)” creates a new entity that uses three components: “2D”, “Canvas”, and “Color”. The 2D component allows us to set an x and y position (cartesian coordinates) for our entity as well as a height and width for the object. The Canvas component causes the entity to be drawn on the Canvas DOM element that displays our game. The Color component allows us to set the color that this entity is drawn as.
Reusing common properties and behavior via custom components
To clean up our code, we’ll create our own components that multiple entities can reuse. Let’s start by defining a “Tree” component that encapsulates the fact that a tree is a 2D, canvas-drawn, colored entity with a specific location on our grid.
Since we’ll be defining many components in the process of making our game, we’ll make a new source file inside of the src directory named components.js. Here is our new “Tree” component definition in that file:
We can encapsulate even more common behavior to make our code more obvious by creating component named “Actor”. An “Actor” will be a component that encapsulates the use of the 2D, Canvas, and Grid components. This allows us to simplify our components.js file as so:
Of course, we need to include src/components.js in our index.html file, as seen in the following code:
And finally, our game.js file is now much simpler because instead of defining all the properties of each entity inline, it simply references the components we just created:
This gives us this on our screen:
Adding a player-controlled avatar
Our Crafty “game” now shows a discernable scene, but we have to way to play it! So next, let’s add an entity that the player can control. This way at least I can stop putting quotes around “game” whenever I’m referring to about our little program.
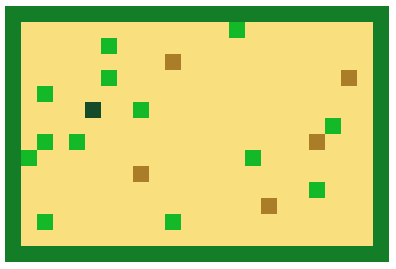
To do this, we’ll define a new component named PlayerCharacter (we’ll call her PC for short). The PC component will require the Actor, Fourway, and Color components. We’ve used Actor and Color before but Fourway is new. Fourway is a very handy component that allows an entity to have it’s movement controlled by one of two four-direction control sets: W, A, S, and D or the Up, Left, Down, and Right keys.
All we have to activate this four-way control scheme for our player character entity is to add the Fourway component to it and then call the fourway() function on the entity to set the speed at which it should move.
Here’s what our game looks like now:
Adding collision between player character and terrain
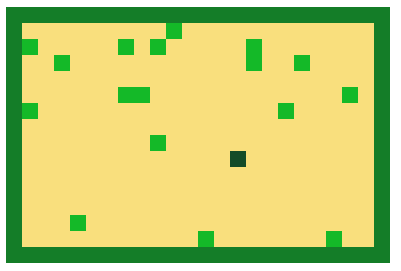
Now that we can move around in our game, let’s require some more thought and attention from the player by making it so that they must navigate around terrain objects. To do this, we’ll make PC collide with and be unable to move through the bushes and trees in the game.
There are only three simple steps to doing this. First we’ll add the Solid component to our Tree and Bush components so that we can later detect they they are a kind of component that cannot be moved through by the PC entity. Second, we’ll add the Collision component to the PlayerCharacter component which gives us some built-in code (which we’ll use in the very next step) to help us detect when the PC has collided with a Solid entity. Finally, we’ll write a function to handle such collisions and register the function to be called whenever a collision occurs.
Here are the additions to our code needed:
Adding villages to be visited (intro to events)
Our game now consists of a player character square that can move around between trees and bushes. Let’s add some interactivity with tangible results by given the player something to do while they move around. We’ll add “villages” that the player can visit as they move around the screen.
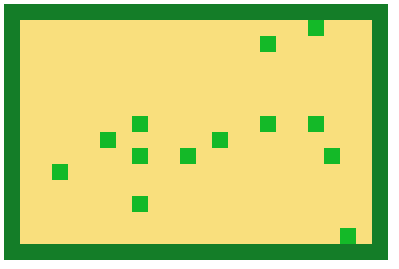
Adding villages also takes just three additions to our code. First, we define a new component named Village and give it a unique color so that they stand out on the game board. Second, we register a callback function that will handle the “visiting” of a village each time the player encounters one. Finally, we add some code to the game startup sequence to spawn some initial villages in random locations.
Here are the additions to our code needed:
Here’s what our game looks like now:
Creating a victory screen and restarting the game
Having an interactive toy is fun in and of itself, but the experience will be more satisfying if we add a goal for the player to accomplish and a victory screen to greet them at the end when they succeed at their goal. To this end, we’ll track the number of villages the player has visited and show a victory screen saying “Victory!” when they visit the last one. We’ll also allow the player to restart the game from the victory screen so they can play it again.
In order to do this we need to clean up our code, organize it a bit better, and add some robustness to a few of our algorithms. This may be the biggest set of changes we’ve made thus far, but it will pay dividends later on as we add more features to our game.
It’s time we used another of Crafty’s useful built-in concepts: scenes. Scenes are a way of differentiating distinct parts of your game from one another. For our game, we’ll start with two scenes: the “Game” scene which runs the game we’ve been playing all along, and the “Victory” screen which tells the player they have won and allows them to start a new game.
Since scenes are such an important part of our code organization, we’ll make a new file to define these scenes, src/scenes.js.
For our “Loading” screen we’ll just display a simple message in text using a new entity with the 2D, DOM, and Text components. These three built-in components make it easy to draw text for your game using standard DOM + CSS browser technology. The only other thing the Victory screen does is wait for the player to press a key and then restarts the game when they do by switching back to the Game scene.
Since we’re already taking some time to improve our code, this is a good time to fix a major problem in our game. Sometimes villages, trees, bushes, and the player are placed on tiles that are already occupied. In addition to being confusing (because the player can only see the last entity placed there) this also makes victory impossible when a village is on top of a bush (because the player character can’t move through them, they get stuck). To work around this issue, we’ll keep track of which tiles are occupied in a 2D array called occupied. Each time we add a new entity to the forest we’ll mark it’s coordinates as occupied in the array. That way when we’re considering putting a new entity down in the forest we can first ensure there isn’t another entity in that spot on our grid already.
Here is all our new code:
The player can now run around the forest visiting all the villages until they get a victory screen. On the victory screen, they can press any key to restart the game.
Adding rich graphics via sprites (plus a loading screen)
Unless you tend to prefer an extreme minimalist aesthetic you’ll probably agree that our game is quite bland to look at. Let’s jazz it up with some higher-fidelity graphics. We’ll use bitmap images to provide this rich content for each kind of entity that the player can see on the game screen. However, for performance, maintenance, and scalability reasons we don’t want to have to load a bunch of individual bitmap images from the web server, so we’ll use a common game development technique called “sprite mapping.”
A “sprite” is a 2D image representing a single visual element such as a tree or bush. A sprite map is a bitmapped image that contains multiple sprites. Lucky for us, Crafty makes it very easy to map sprites from a spite map to components and entities.
To start, you load the sprite map image via Crafty.load. Then you call Crafty.sprite and pass in the width (in pixels) of each sprite in the sprite map, the path to the asset (as you used when you loaded the asset), and object defining what each sprite will be called (more on that later), then the horizontal and then vertical padding between each sprite in the sprite map.
Here’s how the object that defines what each sprite will be called works. Each property on the object is named after a sprite in the sprite map that you will later apply to compoments and entities as needed. The value of each property is an two-element array specifying the x and y coordinates, respectively, of the top-left corner of that sprite within the logical grid of the image. Each property name becomes a component that you can assign to components and entities to have them be drawn with that sprite.
There is one more complication we need to deal with, however, before we continue. Since the bitmap sprite image must be loaded before we can display our game, we must now put in a loading screen so that the player knows what’s happening while the image is loading.
We’ll make few other small adjustments as well: for better contrast within our new color pallete we’ll turn the background of the web page black and the background of our game screen to a dark green.
These steps require a lot of small changes and a few big ones as well, so for the sake of clarity, here is all of our code in full:
Here’s what our game looks like now:
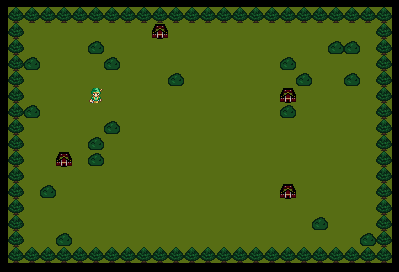
Attribution: The sprite map used here was adapted from an overworld sprite map by Sharm at OpenGameArt. The hunter in the sprite map is from a sprite map by Antifarea at OpenGameArt.
Adding animation and state-based sprite changes
Our game is coming together very nicely, but moving around feels very strange because PC seems to be paralyzed and hovering around the screen while always staring the same direction. To make it seem like she’s walking, let’s animate her steps as she moves around. Even better, we’ll make her look as though she’s facing the direction in which she’s currently moving.
To do this we change the PC entity from using a sprite from our sprite map (from the last step) to using its own dedicated sprite map image which will have a special kind of formatting for animation purposes.
First, we need to load our new image that defines the PC animations. Then we define the PC’s sprite to be the first sprite in the third row of the animation sprite map. Next, we add the SpriteAnimation component to the PC entity and define four animations – one for each of our four directions in which we can move. Finally, we’ll add code to watch for a change of direction and switch animations accordingly. Because we used Crafty’s Fourway component for our movement behavior for PC, we can simply listen for a “NewDirection” event to detect a change of direction and respond to that.
Here is the code that accomplishes this:
PC now appears to walk around as we would expect her to, at least so long as you’re only moving her up, down, left, or right at a given time.
Here’s what our game looks like now:
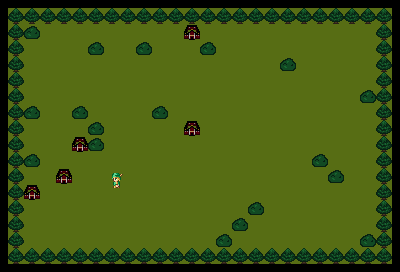
Attribution: The hunter sprite map used here is from Antifarea at OpenGameArt.
Here is a JSFiddle demonstrating our game. Note that because of JSFiddle’s limitations, the contents of game.js, scenes.js, and components.js are combined into the JS part of the fiddle.
Adding sound
We can make our game more engaging by adding some sound effects to punctuate the player’s progress in visiting the villages. We’ll add sound effect that plays every time we visit a village. Crafty makes it very easy to implement such simple sounds and fire them when needed.
First, we add the sound effect file, door_knock_3x.mp3, to the list of assets we load in the Loading scene. Then, we define the sound effect future use by calling Crafty.audio.add and naming that sound “knock”. Finally, we call Crafty.audio.play and specify the “knock” sound every time a village is visited.
Here is the code that accomplishes this:
A coat of polish to finish it off
Our game is now functionally complete. But it feels very unfinished, so let’s add some polish to give it a more solid feeling. Most notably, we’ll add two more sounds – one for when the game starts and one for when you win – and one more entity for our map – the rock, which is exactly like a bush but with a different look to it.
Other miscellaneous changes:
- Ensure five villages are spawned for each game
- PC speed (via Fourway component) reduced to 2 and animation speed commensurately reduced to 4
- Game window centered on screen
- Victory and Loading screen text wording, color, size, and positioning improved
- Wait a few seconds after showing victory screen before allowing a game restart
Here’s our final code:
You can play the final game here.
Conclusion
I hope you’ve found this introduction and tutorial helpful and that you find Crafty to be as useful a tool as I have for prototyping simple HTML5 games. Crafty’s community continues to grow and Crafty users share useful new components online on the official Crafty Components site. If you make a game of your own with Crafty and would like to share it and/or its code with the community, post it on the official Crafty forum.
UPDATE (January 20th, 2014): Upgrading to Crafty 0.6.1
Throughout this tutorial we used Crafty 0.5.3 to build our game. In the year since I first wrote it, Crafty has since made significant improvements as it has evolved. Many of our readers have asked us to update our code to work with 0.6.1 (currently the newest version as of this writing) and several of you also sent me clues as to how to make the update. Thank you! Here are the changes needed to make the update:

Comments