Multiplayer and browsers
When you consider making multiplayer games, there are many methods available for creating a game that friends can play online. There is a good variety of multiplayer game types - take for example a card game you play synchronously with friends. Turns are made, information is exchanged in (semi) real time and the game progresses in discrete steps. Another example, Chess, can be asynchronous. Players take their time, contemplating possible actions and play their next move one week from now. These types of multiplayer games exist in browsers, and have for a long time. The nature of the browser itself makes it easy to make semi real time games, but we want more-visceral real time action.
Card games and Chess both usually require communication with a server and communication with the other players in order to work online. This is the foundation of a multiplayer experience to be possible - and for a long time this has existed via HTTP, where POST and GET have always been used to manage games.
The trouble with these methods is the delay, posting a message and waiting for a response each time is just too slow. It works for the semi real time and asynchronous games, but real time games require messages sent and received sometimes in the region of 33~66 times per second, something that is not quite possible with HTTP alone.
Luckily, in modern browsers we can take one step higher, and have a real time connection between a server and clients. The purpose of this discussion is to present one overview of how multiplayer games are made. We will look at input prediction, lag compensation, client interpolation and more importantly - how to do this in your normal browser using websockets. The article will present a playable demo with parameters to play with, showcasing the concepts discussed.
The technologies that we have chosen and why
Socket.io
socket.io is a powerful and flexible server-side and client-side component that enables real time networking in your browser. Not only does it support newer technologies like web sockets, but it also falls back safely onto a Flash networking layer, XHR or JSON long polling and even an HTML file transport layer. Most appealing about it perhaps is the simplicity and inherently asynchronous nature it brings, which is extremely useful when writing server and client code.
Another benefit of using socket.io is the fact that it ties into Node.js seamlessly. When coupled with Express, on connection, it can serve the client-side includes, game files, and data, making the integration clean and easy. Once you set it up, the amount of code between first connection and communication with a client is nothing short of amazing. And it would work in all browsers, mobile included.
Node.js
node.js is an easy to use, flexible and cross platform tool. It is like a swiss army knife of evented IO. It has a massive following of dedicated users, developers and module authors. It is supported on a good number of server hosting platforms for web applications, and is easy to install on a dedicated server of your own, so finding a host should not be a problem.
Among many of these great modules available for Node.js, is a web framework called Express. It covers serving files, complex routing, client authentication and sessions, and much more. It fits perfectly into the stack between socket.io and our clients, where socket.io can serve its files to the clients through Express and Express can handle the game content for us.
Canvas/HTML5
This article uses a 2D canvas to demonstrate the methods we are going to cover, which allows us to draw some text and boxes really easily.
Getting started with a real time multiplayer connection in your browser
Covering all possible options and installations and configurations for the above technology is a little out of scope for this article, but each of the above tools have their own documentation and should not take long to have set up and working together. For the sake of brevity we will dive right into making a simple game example instead. The information below is the minimum required to set up an empty canvas, connect to the socket.io server and receive messages.
Start with a simple web server, enter Express
The code for a simple Express server is really short and straightforward. It serves files on a port specified (4004 in this case) and it only serves files from the root folder (like index.html), and from a specific ‘game’ path we specify (like game/).
Socket.io, adding the real time component
Now we add the code for the socket.io part of the node.js server. It goes in the same file as the Express code, just below it as shown in the gist. The server will attach itself to Express so that it may serve the client files when requested. We do not handle any sessions in this example specifically, but you can learn about using those from this site: http://www.danielbaulig.de/socket-ioexpress/.
Index.html, connecting a client to the server
The client side needs very little code to be able to connect to the server. As we go further, it becomes more intwined, but this is all that is required to connect to the server and send or receive data.
Getting into the gameplay
What we need now is a simple interactive example for this to tie into, to get our feet wet. We are going to have two blocks running around in the same space. There is a lot of code and logic that goes into creating something that runs smoothly over the internet, and any game related code getting in the way is not as useful to this article. Instead, we focus on the multiplayer and use a simple example to demonstrate.
Some notes on developing real time games
Not all developers make games. There are some things that are new to developers that are entering the world of games that should be covered briefly.
Frame rate independence
When a block travels across the screen, it can be a simple line of code. block.position.x
+= 1; This 1 here, what unit is that measured in? Actually, this is one pixel - but it is moving 1
pixel per frame. Each time the loop runs, we move one pixel. That is - at 30 frames per second, it moves 30 pixels. At 60 frames per second, it moves 60 pixels. This is really bad for games, because hardware and performance can vary from one device or computer to another. Even between different browsers, this
problem can be a huge difference. One player reaches the wall, the other barely moves at all.
In order to ensure that the block moves the same distance over the same amount of time, the
concept of delta time is used. This value is the milliseconds per frame (mspf), which is measured while updating your game. It is how long one update takes. By taking the time at the start of your loop, and the time at the end of the loop, you can work out how long the update has taken.
At 30 frames per second (1/30) the delta is about 0.033s. One frame, every 33.3 ms. At 60 frames per second (1/60) the delta is about 0.016 or 16.66 ms per frame. So lets say that the ball is moving at 1 pixel per frame. To solve the problem of frame rate dependence, we multiply any change in position by the mspf value, balancing out the time, making the distance always the same.
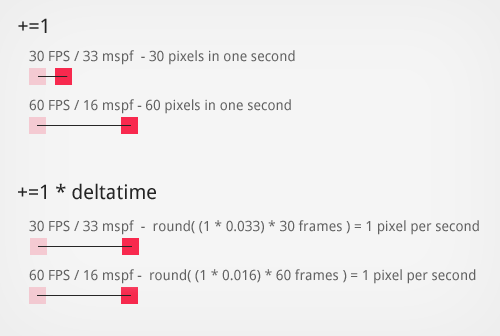
Our example calculation becomes ball.position.x += (1 * deltatime);. With bigger delta (slower frame rate) the ball moves more pixels - reaching the destination at the same time as at
a smaller delta (higher frame rate). This gives us concrete units that will act the same at
any render speed. This is critical for animations, movements and pretty much any value that changes over time: they all should be scaled to the mspf.
Planning for change
Games are often a dynamic thing: they require tweaking and changing of many values to feel good. Iteration is a big part of getting this right. This is common sense for most programmers, but always try and design your code so that you have as many values and variables as possible to tweak. Then expose them in a really easy to use place, so you can constantly refine how the game feels and how it works without much digging and effort. Try and bring your iteration time down as much as possible.
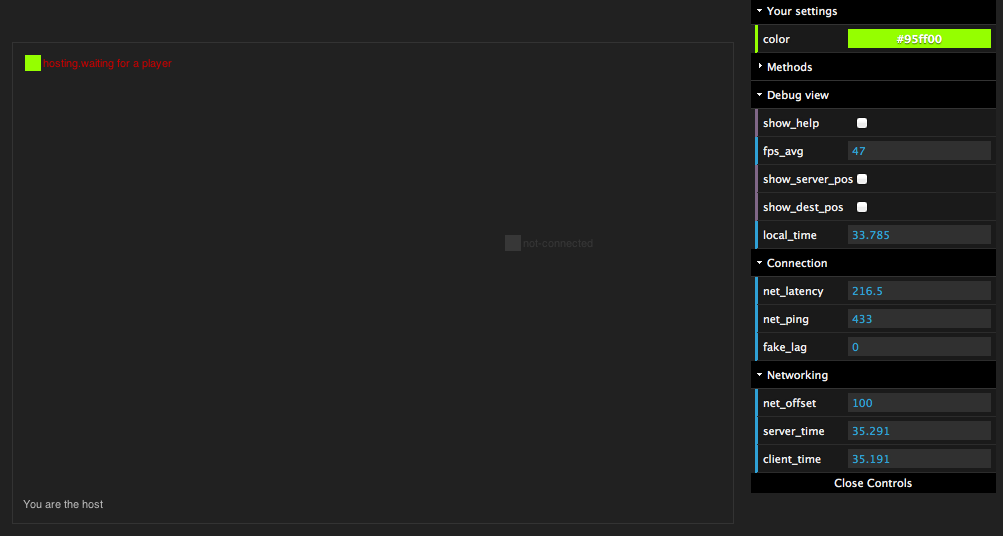
In the demo accompanying this article, we have exposed our values via Dat.GUI so that you can change and interact with the demo in real time, and feel the effect of the changes as you make them.
Multiplayer games in real time
Games are a difficult thing to make. Getting the game play to feel good, physics to be smooth, collisions to be correct and controls to feel tight - all these things take hard work already. Adding a multiplayer component makes this far more complex, as there is now a server involved. Players need to be informed of other players’ actions but there is a network delay.
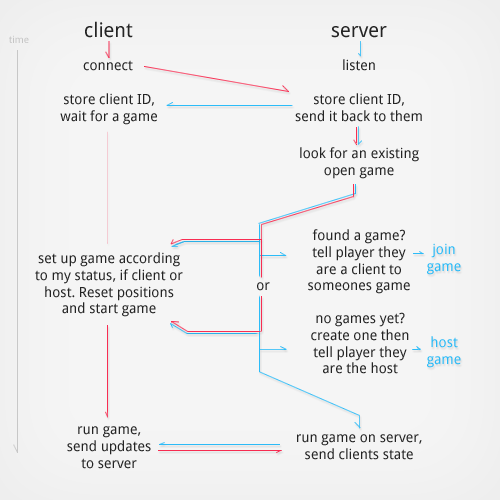
Networking on a high level, a simple lobby
The way we will approach networking our game example is fairly straightforward. Our game in this demo can only have two players in it, for simplicity. In our demo, a client connects to the server, then the server either gives them an existing game to join, or creates a game for someone else to join. Then the game is added to the list of games on the server to update, and the clients update their game on their end. This is illustrated below; it works like a very simple lobby system.
Networking and the game loops
When it comes to a real time game, we want to run the game logic itself on the server AND the client. This is due to the fact that the server needs to be the authority on the state of the game at all times, but the client needs to run the game locally too. Each frame on the server, input from the network will be processed and applied to players, and that change is sent to the other players at a fixed rate. On the client, input will be collected and sent to the server, and positions can be updated while waiting for the messages to come back from the server (client prediction).
The approach we will be implementing works as follows:
- Client presses the right key, client moves immediately right
- Server receives the input message and stores it for the next update
- The next server update, the player input is applied, moving him right on the server state
- All changes in state are sent to all clients
- Client receives the message immediately setting clients positions (authoritative)
- Client can smoothly correct mistakes in prediction from the first step
The game server set up
On the server, we have two updates running. The one update is run at a high frequency, which updates the physics and state of the game. We will call this the physics update loop, which is run every 15ms (about 66 updates per second). The second update we can call the server update loop, which is run at a slower rate, every 45ms (about 22 updates per second). In the server update loop we send the state of the server to all clients. Most of what we will implement is based on the theory presented in the networking of the Source Engine from Valve Software.
The server update loops looks like this: :

The server physics loop (15ms)
Don’t let the term physics scare you, in our example it is extremely simple linear motion. We take the input from the clients, and we move them according to what they pushed. If they press left, you move them left. When we add client side prediction, we need to also tell the clients which of their inputs we had processed last. So how does our server update the physics?
- Process input that we stored from the network
- Work out the direction they intended to move based on input stored
- Apply the changes of this direction to the player position
- Store the last processed input number
- Clear any inputs that we have stored
The server update loop (45ms)
The update loop sends the state of the server to all clients. This varies per game of course, and in our example the state consists of player positions, the inputs of the player we have already processed (the last processed input number), and the local server time.
What you send in the state update is up to you, and often more than one server update loop can be employed to lower the amount of traffic used. A simple example would be a day/night cycle. If the cycle was changing at a much lower rate than everything else, you can send the state of the sun every 5 seconds instead of every 45 ms.
The client set up and update loops
On the client we also run multiple loops, one for the physics/game at 15ms again, like the server. The second is the regular update loop, but instead this one runs at 60fps (preferably), or as fast as the client can run the game. In HTML5 we usually rely on RequestAnimationFrame to handle this update, calling whenever the browser updates the window. This update loop is detailed below, and is quite standard:
- Clear canvas
- Draw info/status
- Handle input (sends input messages to server)
- Update position (using client prediction)
- Move the other clients based on the server position (interpolation)
- Draw players on canvas
The client physics loop
The important thing about the client physics loop has to do with keeping the client positions in sync with what the server has decided our position to be. This means the physics has to match the server when it decides how far to move us, and this is why the physics is updated at a fixed rate. Both the server and client physics should arrive at the same conclusion, given the same inputs. If you have pressed right twice, the results should be almost identical to what the server will calculate your position to be. This is what makes client prediction possible when attempting to mask the delay in a network and the clients.
Important Networking Concepts
Client prediction
We have mentioned this before now, so lets take a look at what exactly it entails. In a naive approach to networking, you might try the following model:
- Client presses the right key, tell the server
- Message arrives at server sometime in the future ( 200ms latency )
- Server sends back the new position to the client
- Message arrives at the client ( 200ms latency )
- Client updates their position 400ms+ later.
This approach might work well over LAN connections where the latency is really low, but when connecting players to a server via the Internet, latency can be anywhere from 30ms to 800ms - rendering the game unplayable because of the delay. When you push a key the response is so badly delayed that it will not be a very good game to play at all. But how do we solve this?
Client prediction is the solution, and simply means acting on input immediately, predicting what the server will calculate as well. We apply input with the assumption that your results and the server results (whenever they arrive) will be the same. When a client presses the right key twice, and ends up at x = 2, the server will arrive at the same conclusion and tell you 600ms later - you are still in the correct place.
This is important for immediate feedback on the client side, and even though updates are running via a server, the client positions should match up.
Interpolation of other client positions
Now all we need to update is the other client positions, as they arrive from the network. Again, a naive approach would be to simply set their positions as soon as the message arrives from the server but this leads to extremely jerky rendering of the other clients.
The solution is to store the positions we get from the server and interpolate between them. This means that we draw them a few frames behind the server, but it allows for very smooth updates of all other client positions. In our demo, based on the Source Engine article listed above, we draw the other clients 100ms behind the actual server positions.
All of this is implemented in the demo and elaborated on below in code form, but for more information and very good diagrams on the topic, Gabriel Gambetta did an excellent three part series on the concepts presented - including client prediction, interpolation and the reasons why these work best for real time games. Most important for our example is that we store the input sequence of each input the player gives us. We use this to track where the server is in our list of inputs, and we re-process input that the server has not yet received.
Understanding the demo code
The demo code presented at the end of the article features a working set of the topics discussed, including some debug controls to tweak and see changes and differences in approaches. The demo looks something like this :
Now that we have seen the theory of the example, we can start to see how the code comes together.
How the code is structured
The code in the demo contains four files, each with different portions of the example. The files contain the following logic:
client.jsThe logic for the game client setup in the browser.app.jsThe server side app to run on node. This handles all the node/express/socket.io set up and code.game.server.jsThe logic for the game server (‘lobby’).game.core.jsThe logic for the game play itself, both server and client.
Core game play code
The code inside of game.core.js is the important part of our example. The code is shared between both server (running on node.js) and the client (running in the browser). This allows the code to use the exact same functions and algorithms to process input, synchronise movement, and share data structures.
Classes of the core game play
The game.core.js file hosts three classes, described in detail below.
The game_core class
This class is the driving factor for the whole game state. It runs the update functions, it handles the outputs and inputs of the game and manages the game as it changes. The game core can be described as the game world. It contains two players, a boundary, and it runs the world logic. It makes sure the physics simulations are started up, it makes sure they run on time and it handles the logic of the players inputs.
The game world is where multiplayer happens. We want the game world to exist in three places (for this demo). We want to run a copy of the game world on each client, and one on the server, per game. This is what the lobby does in game.server.js - it creates a world for each set of players that join.
All the code is named according to the purpose served. If the function name starts with client_, this code will never be called on the server side. If the function begins with the term server_, similarly this code will not run on the client but the server only. All other functions on the game_core class is directly related to the game state that gets shared between server and client.
The game_player class
The player code is probably a lot lighter than you might have expected, but the player class simply maintains it’s own spatial properties and knows how to draw itself (if required, like on the browser client). On the server, of course, the draw function is just never called.
An example function that is shared between the client and server
Important functions in the multiplayer code
Some of the functions are more important to multiplayer than others. Let’s look at the important concepts outlined in code, to see how the flow works. The code examples are sometimes simplified to demonstrate the key concept.
Entity interpolation (other clients)
The interpolation/smoothing of the other clients. This is handled in this fashion:
- Store the network messages from the server about other clients, for at least 100ms
- Interpolate between a last known position, and a newer position in time (100ms behind the server time)
- Draw the interpolated clients at the interpolated position.
The way we achieve this is as follows :
Client prediction (local client)
The prediction takes place in two places, when receiving server authoritative responses, and before drawing we process our input as it happens locally. The logic for this is:
- Handle input from client
- Store input and the time of input for smoothing later
- Store the input sequence
- Send the inputs and input sequence to the server
- On confirmation from the server of last known input sequence,
- Remove inputs that the server has already processed
- Reapply inputs that still remain to be confirmed
Here is the code simplified to show the input handling:
Conclusion and demo (code and links)
Multiplayer is a complex thing, and hopefully this simple example has given you an insight into a world of having friends play together in real time.
View the demo
http://underscorediscovery.aws.af.cm/?debug
Get the code
https://github.com/FuzzYspo0N/realtime-multiplayer-in-html5
Know your enemy (further discussion)
Keep in mind while you venture into the world of real time multiplayer - it is both a challenging and rewarding experience. Do some more research outside of this article and find out just how your real time game needs to be structured. There are many great resources: Glenn Fiedler has extensive experience and generously shares a wealth of knowledge on the topic. Be sure to read all of the articles on multiplayer and programming games that run in real time. He covers the basics of What Every Game Programmer Needs To Know About Networking, and also just as important is his article and demo on Networked Physics.
Another set of good articles are from Forrest Smith, who worked on the Supreme Commander engine at Gas Powered Games. This article is aimed at Real time Strategy Games (RTS): The first part, Synchronous RTS Engines and a Tale of Desyncs and the second, Synchronous RTS Engines 2: Sync Harder.

Comments